Azure DevOps CI/CD Pipeline for ASP.NET Applications
Overview
This comprehensive guide demonstrates how to host an ASP.NET web application using Azure DevOps (formerly Visual Studio Team Services). You'll learn how to configure Build Pipelines, Release Pipelines, and automated deployment workflows using the Azure DevOps platform.
What You'll Learn
- Setting up self-hosted build agents on VMs
- Configuring continuous integration (CI) pipelines
- Building ASP.NET applications with NuGet dependencies
- Publishing artifacts and creating Windows executables
- Setting up multi-environment release pipelines (QA, Stage, Prod)
- Implementing automated deployments with Git triggers
Prerequisites
Tools & Technologies
The following tools are used throughout this guide:
- Azure DevOps - CI/CD platform
- Git - Version control system
- Sublime Text 3 - Code editor
- Cmder - Console emulator
- PowerShell - Task automation
- Windows 10 Enterprise - Development OS
Architecture Overview
graph LR
    A[Developer] -->|Push Code| B[Git Repository]
    B -->|Trigger| C[Build Pipeline]
    C -->|Build Agent| D[Compile & Test]
    D -->|Publish| E[Artifacts]
    E -->|Trigger| F[Release Pipeline]
    F -->|Deploy| G[QA Environment]
    F -->|Deploy| H[Stage Environment]
    F -->|Deploy| I[Production Environment]
Part 1: Initial Setup
Step 1: Local Machine Setup
Before pushing your project to Azure DevOps, ensure your local development environment is properly configured with Git and necessary build tools.
Best Practice
Initialize your local repository with a .gitignore file to exclude build artifacts, packages, and temporary files from version control.
Step 2: Push Project to VSTS Git
Once your project is initialized locally, push it to the Azure DevOps Git repository.
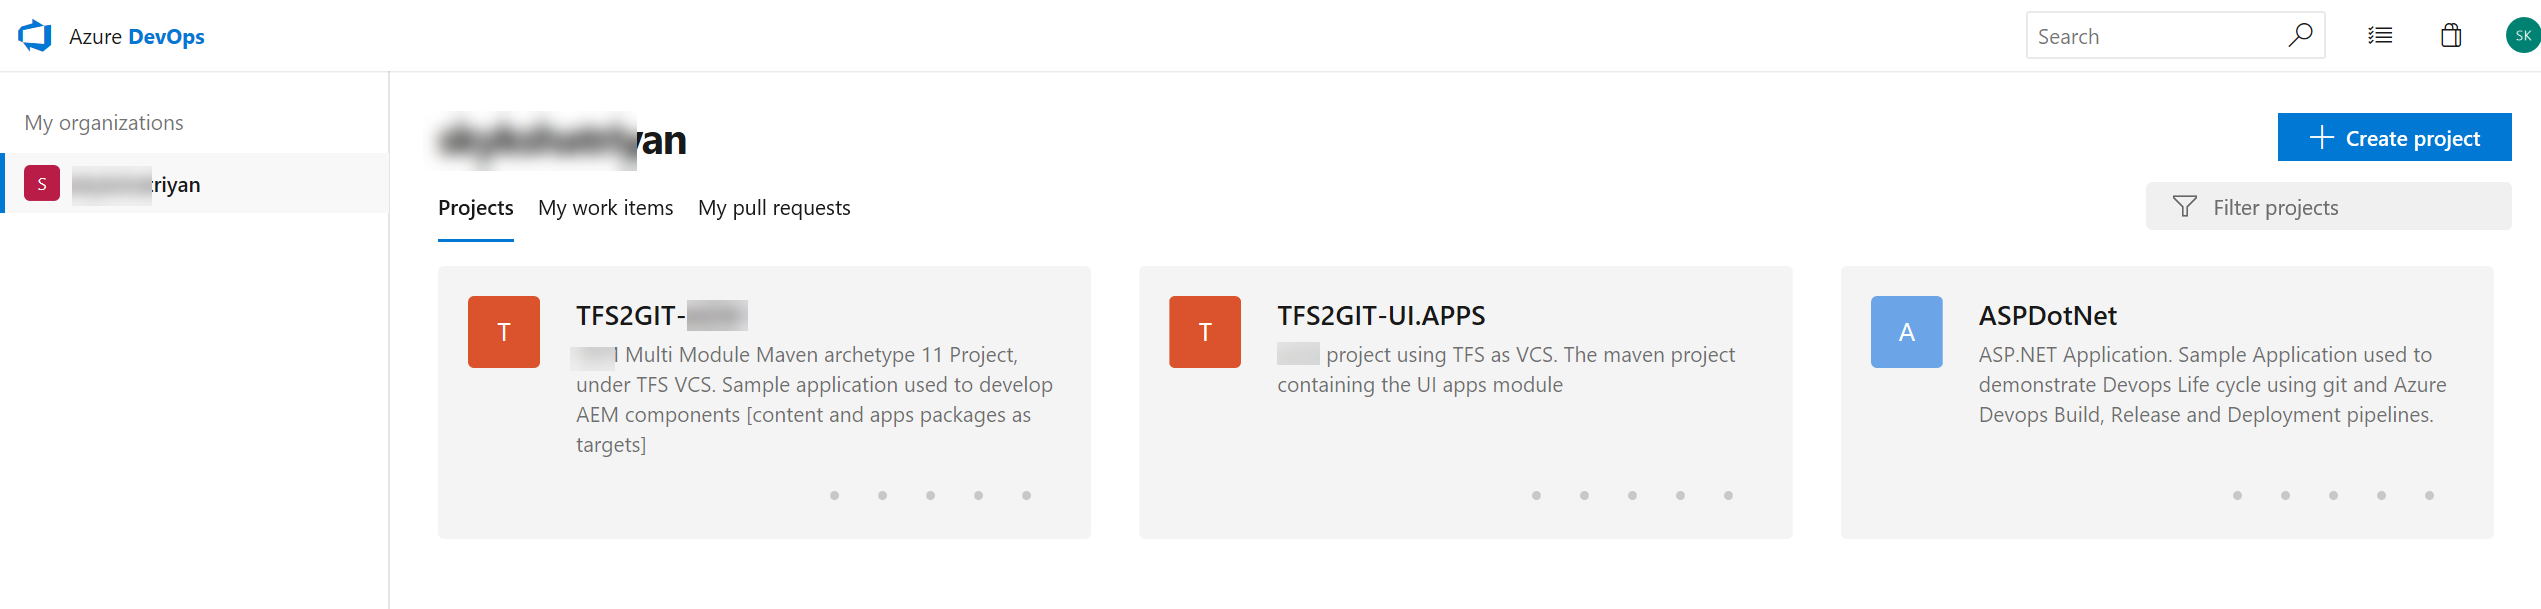
Note
Azure DevOps supports both Git and TFVC (Team Foundation Version Control). This guide uses Git for version control.
Step 3: Project Overview & Dashboard
Navigate to your project's overview page to see the repository structure, build status, and team metrics.
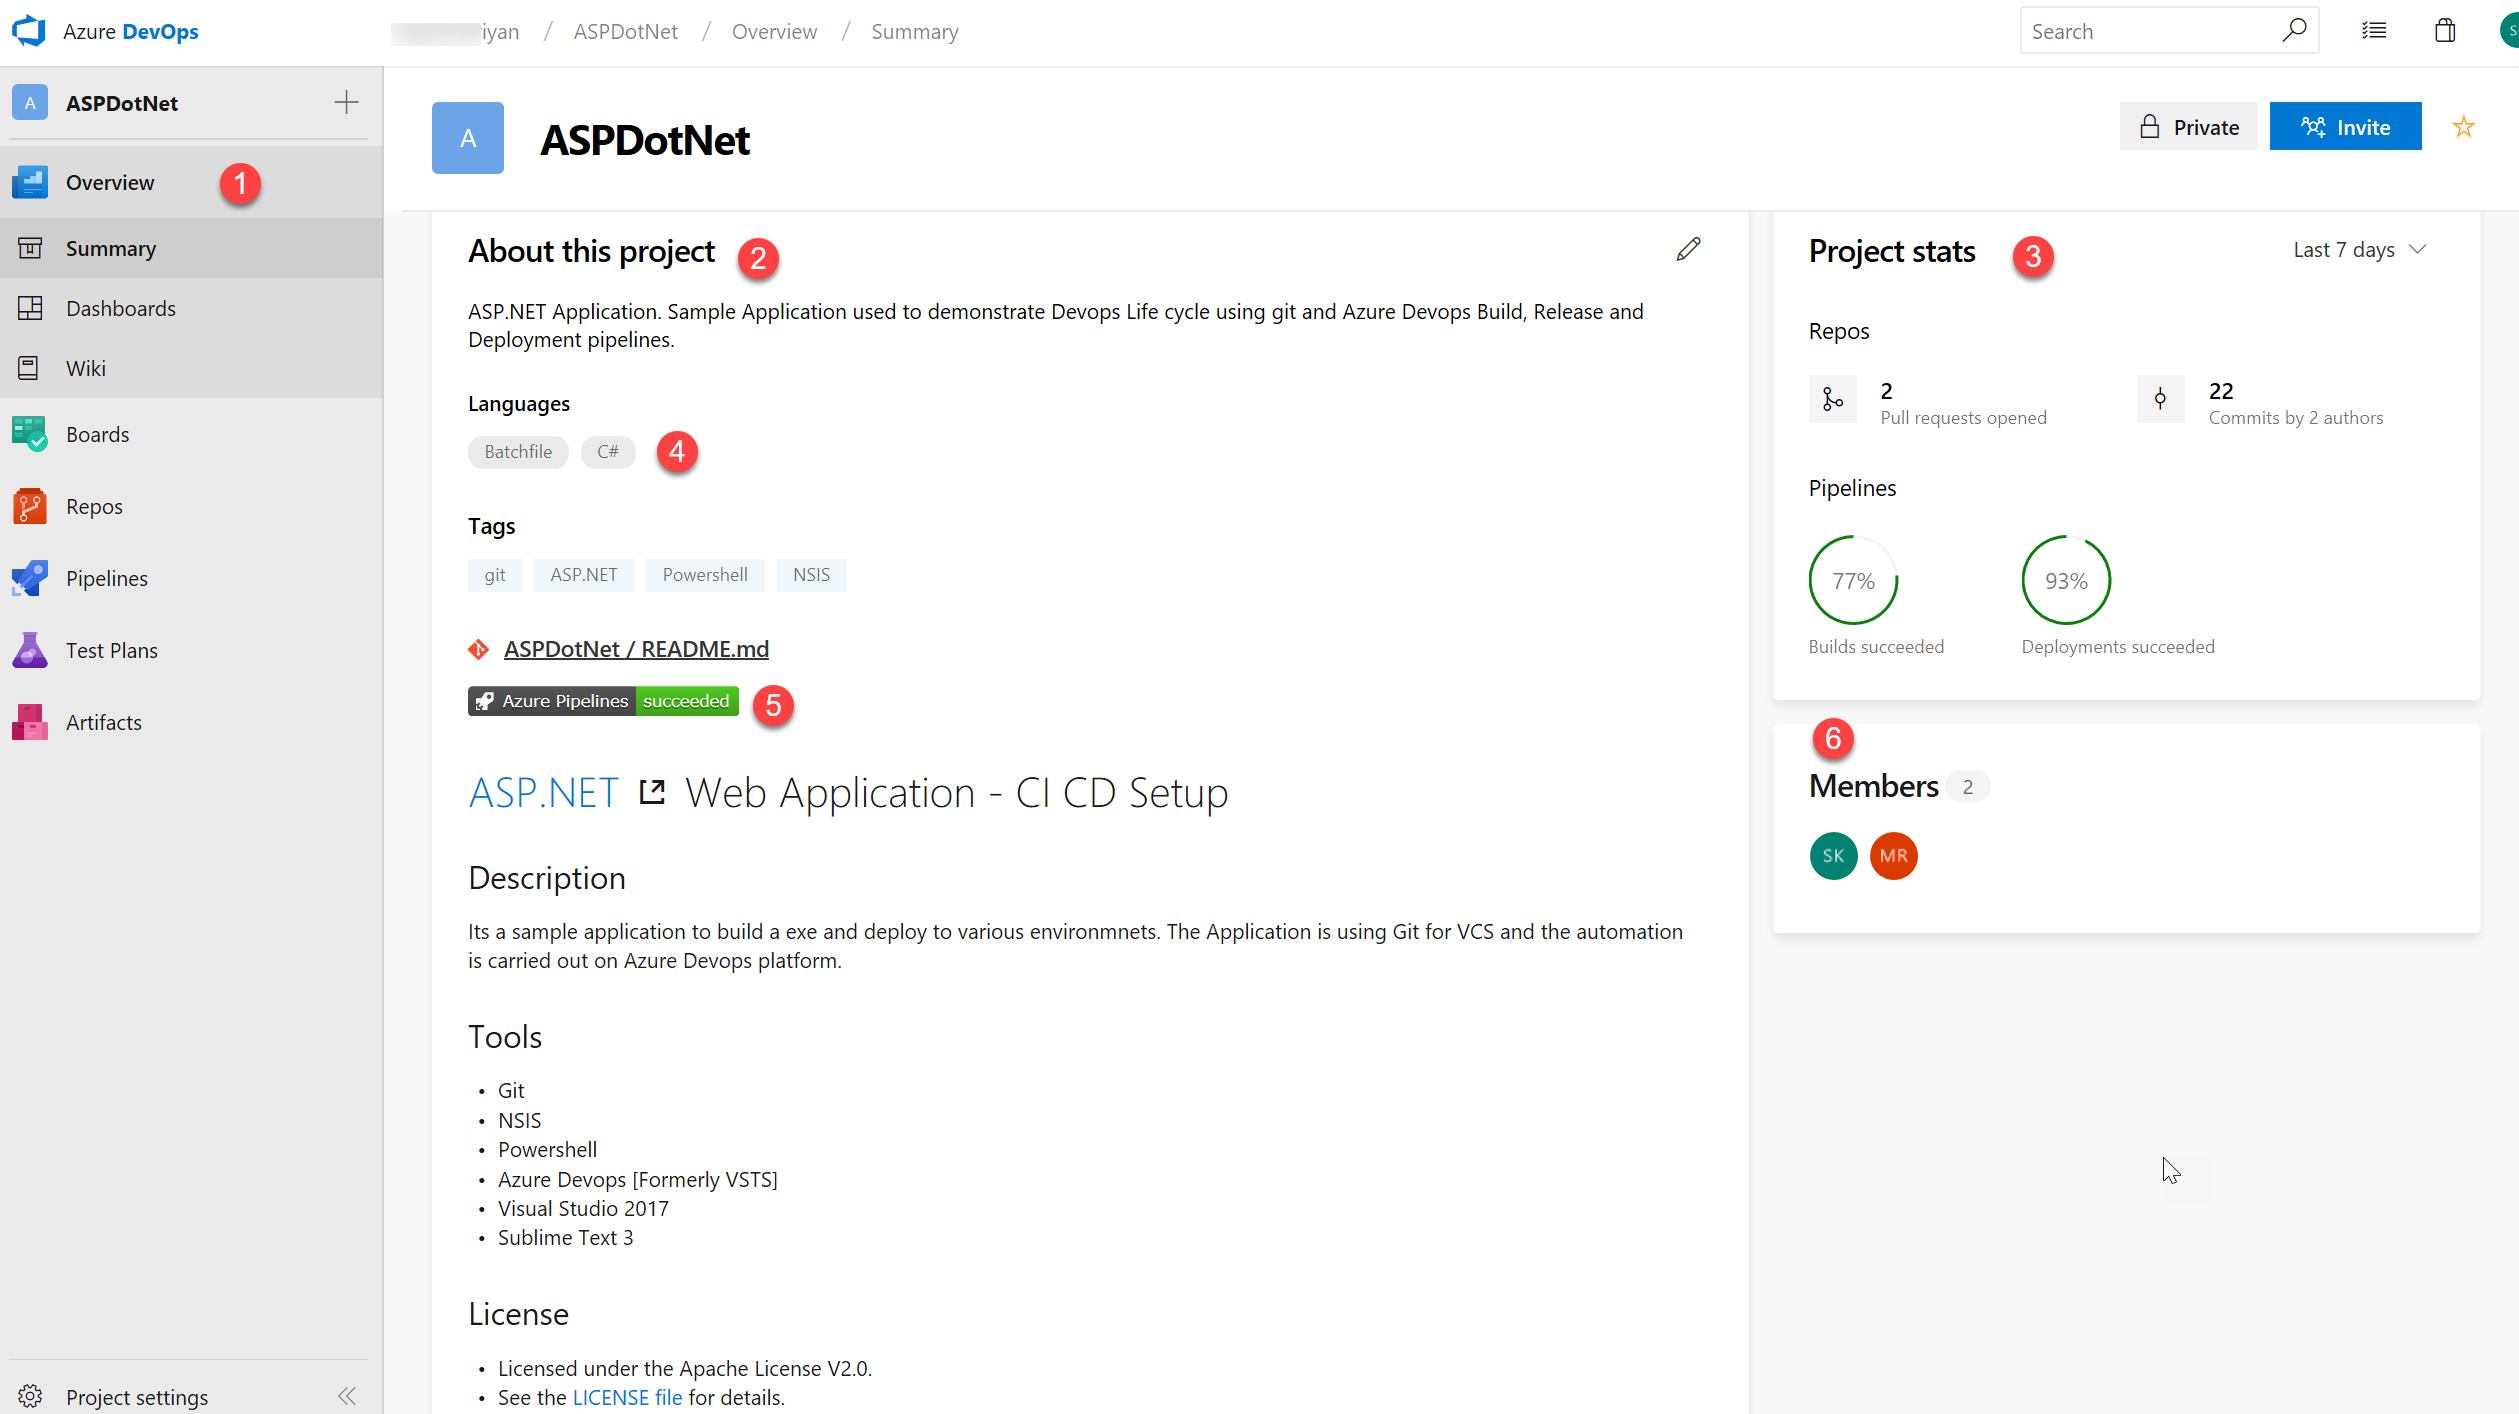
Key Dashboard Elements:
- Overview - Access from the left sidebar
- Project Description - Summary of project purpose
- Language Indicator - Primary programming language
- Build Status - Real-time pipeline status
- Project Statistics - Commits, pull requests, success rates
- Team Members - Contributors and their roles
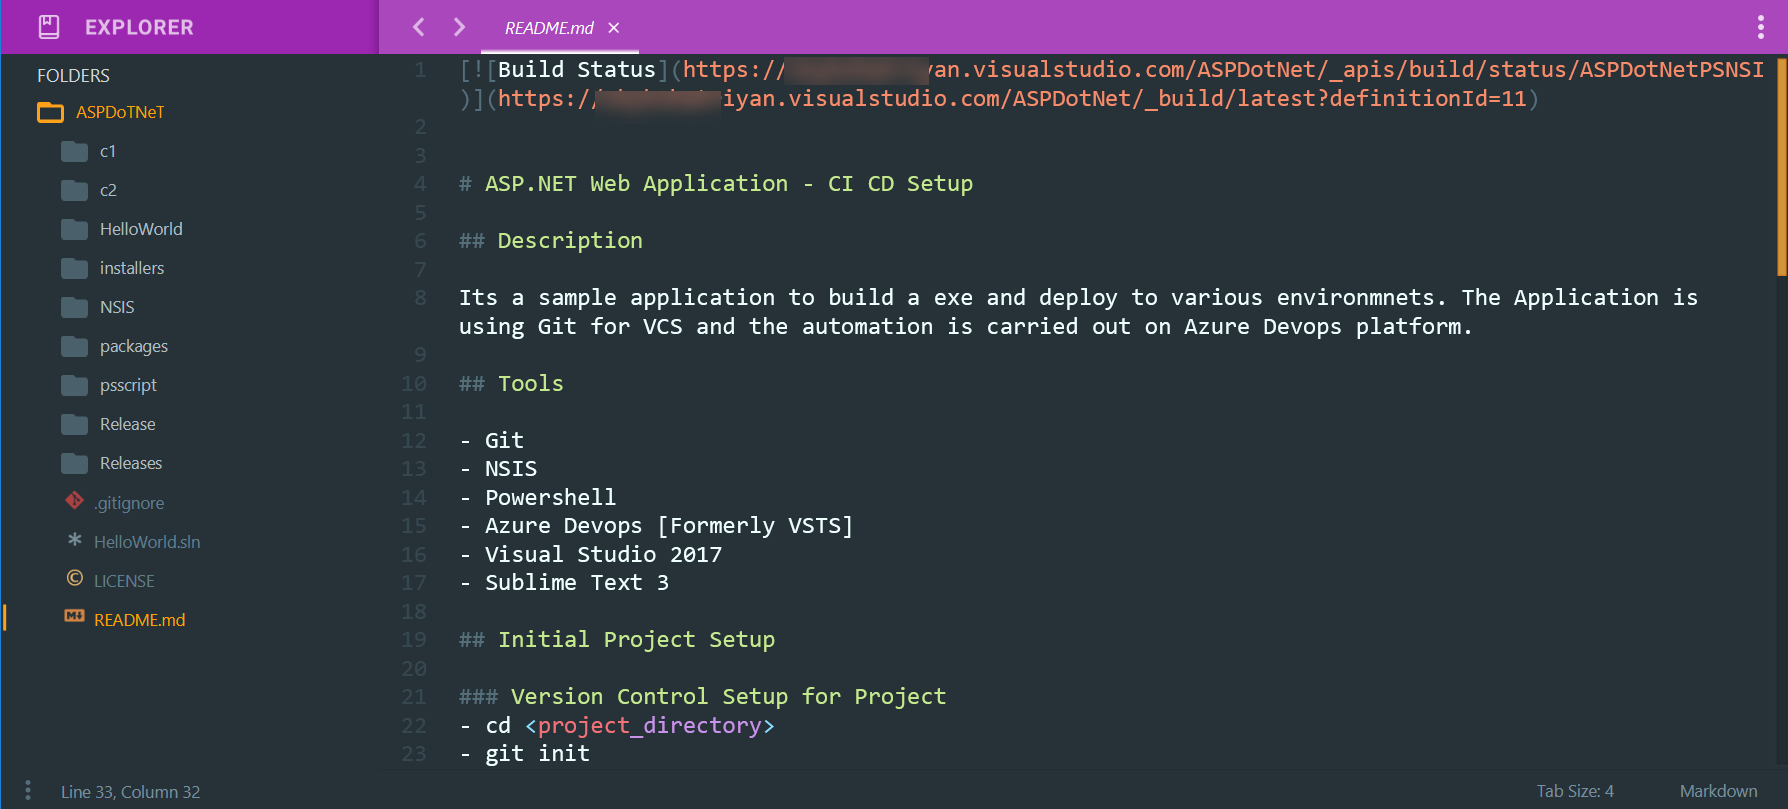
Step 4: Repository Information
View your repository structure, files, and commit history in the Repos section.

Repository View Components:
- Repo Selector - Choose from available repositories
- File Explorer - Browse folders and files
- Commit History - Last modified dates with SHA-1 commit keys
Git Integration
All standard Git operations (clone, branch, merge, pull request) are available through the Azure DevOps interface.
Part 2: Build Agent Configuration
Step 5: VSTS Agent Setup
Configure a self-hosted VM as a build agent to execute your build pipelines.
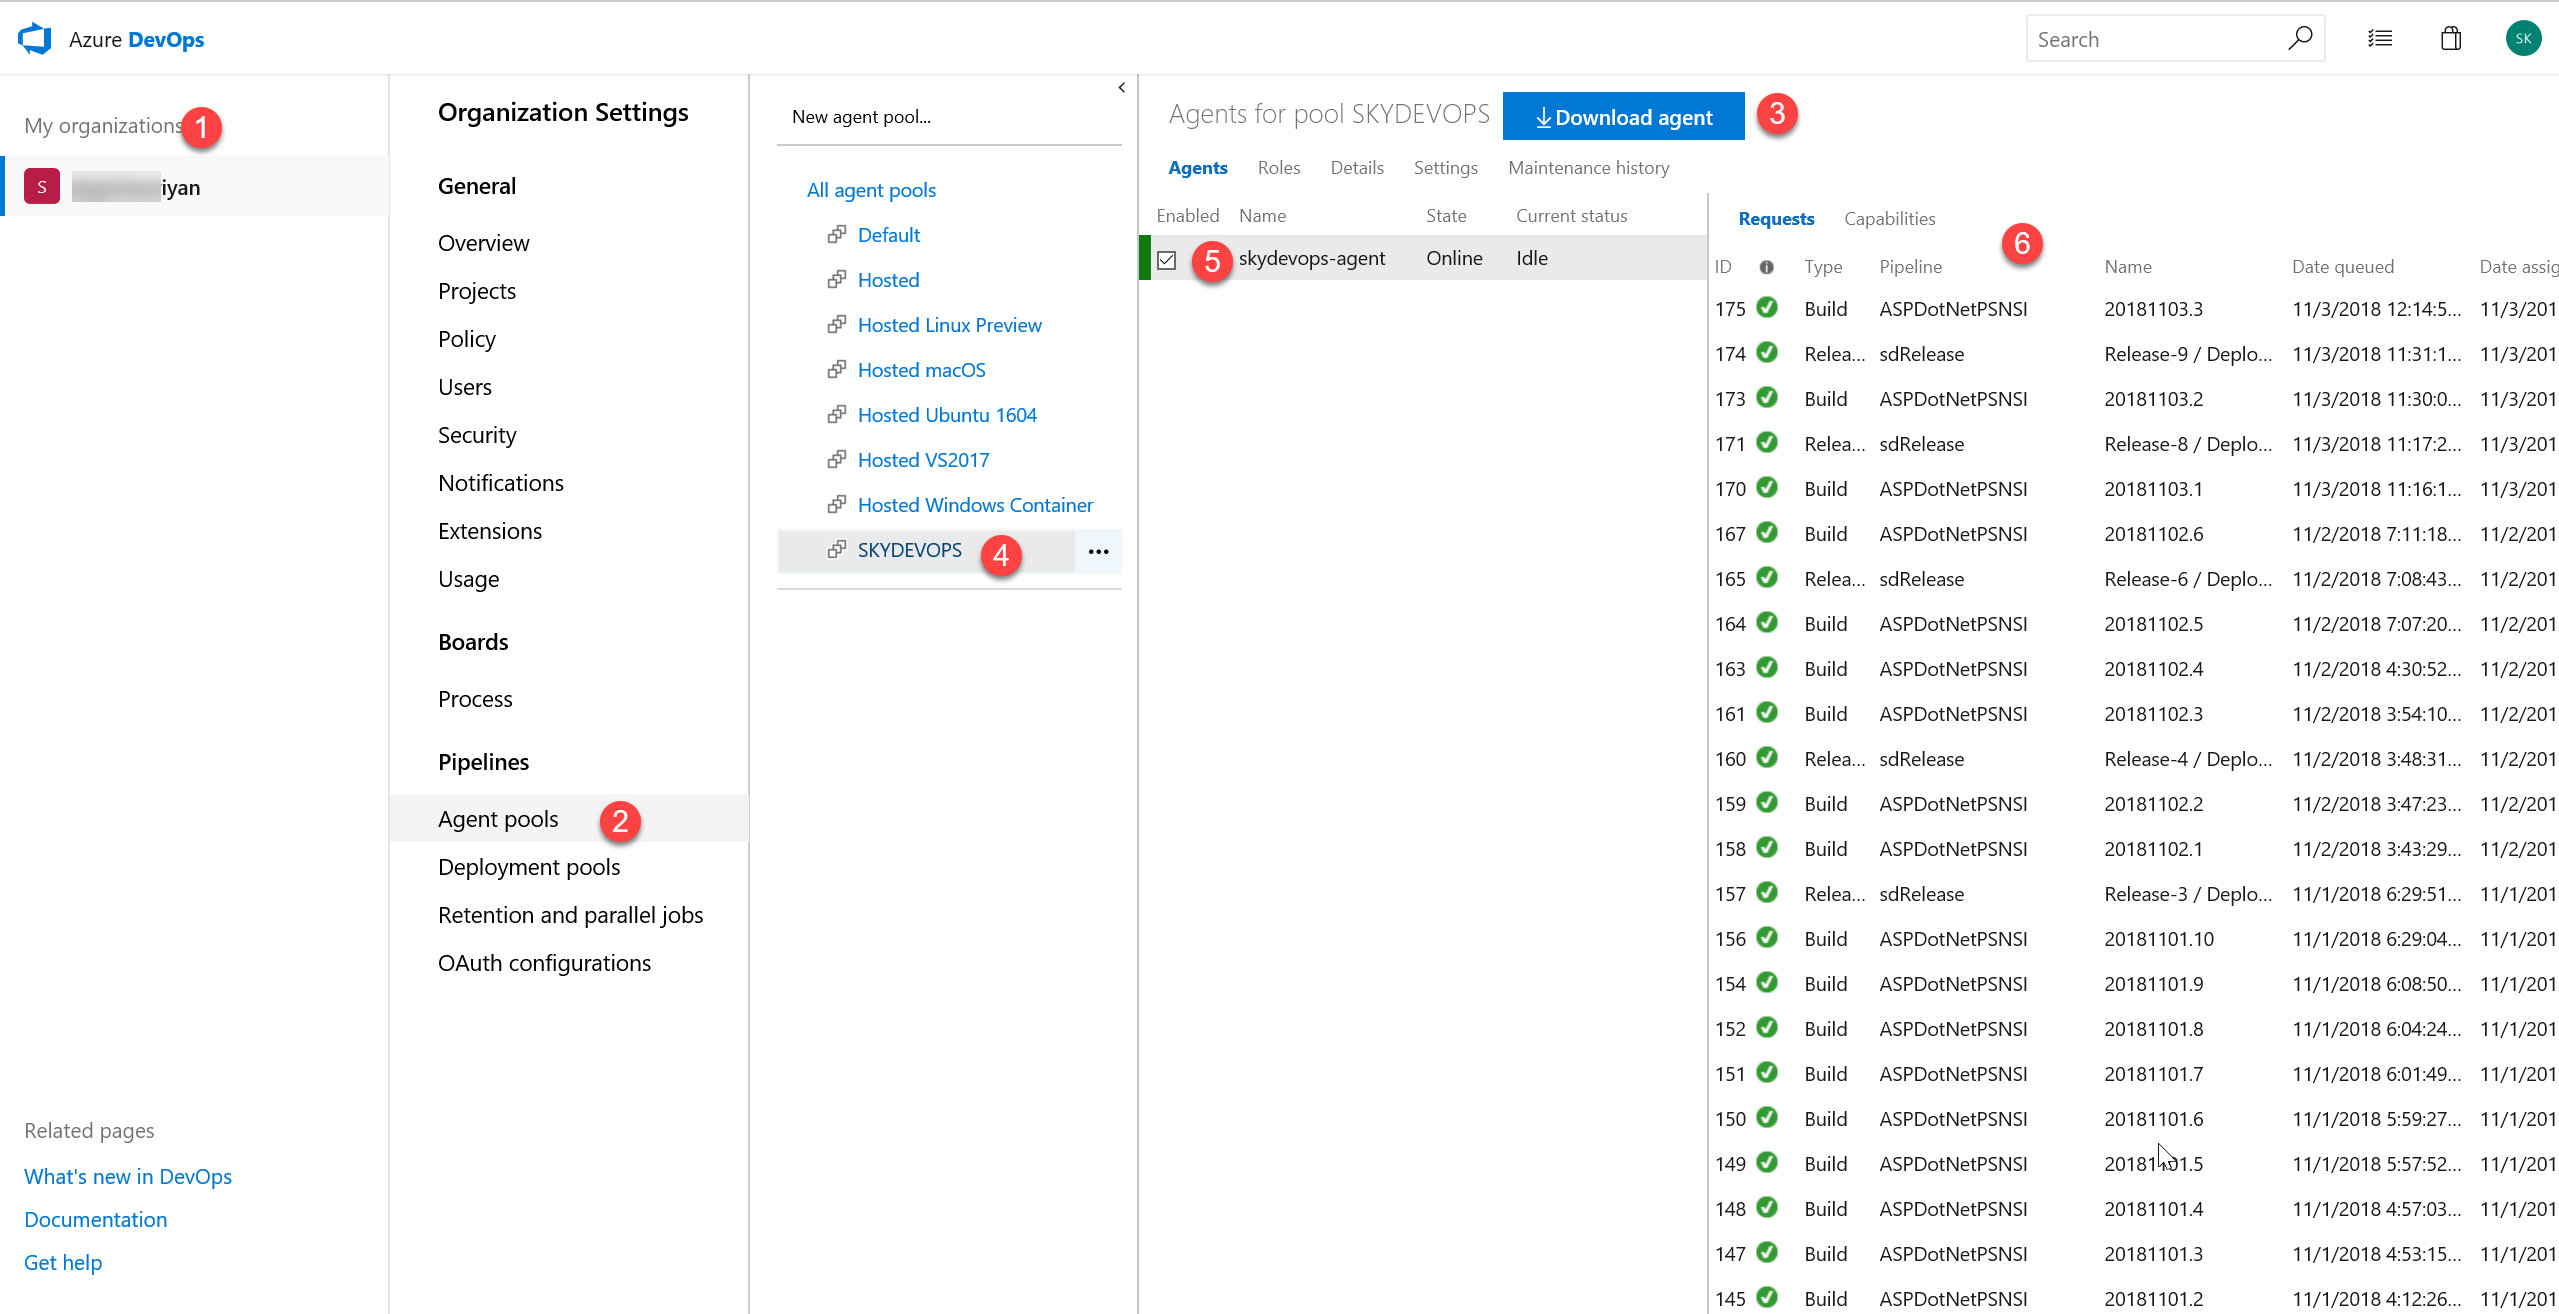
Configuration Steps:
- Navigate to Organization Settings (gear icon)
- Select Agent Pools from the left menu
- Download the agent package for your OS
- Follow installation instructions to configure the agent
- Verify agent appears in the pool with "Online" status
Agent Requirements
Ensure your build agent has:
- Visual Studio Build Tools installed
- .NET Framework SDK
- NuGet CLI
- Sufficient disk space for builds
- Network access to Azure DevOps
PowerShell Agent Installation
Part 3: Build Pipeline Configuration
graph TD
    A[Get Sources] --> B[Restore NuGet Packages]
    B --> C[Build Solution]
    C --> D[Run Tests]
    D --> E[Create Executable]
    E --> F[Publish Solution]
    F --> G[Publish Artifacts]

    style A fill:#0000FF
    style G fill:#008000
Step 6: Build Pipeline Setup
Create and configure your build pipeline with proper agent selection and artifact settings.
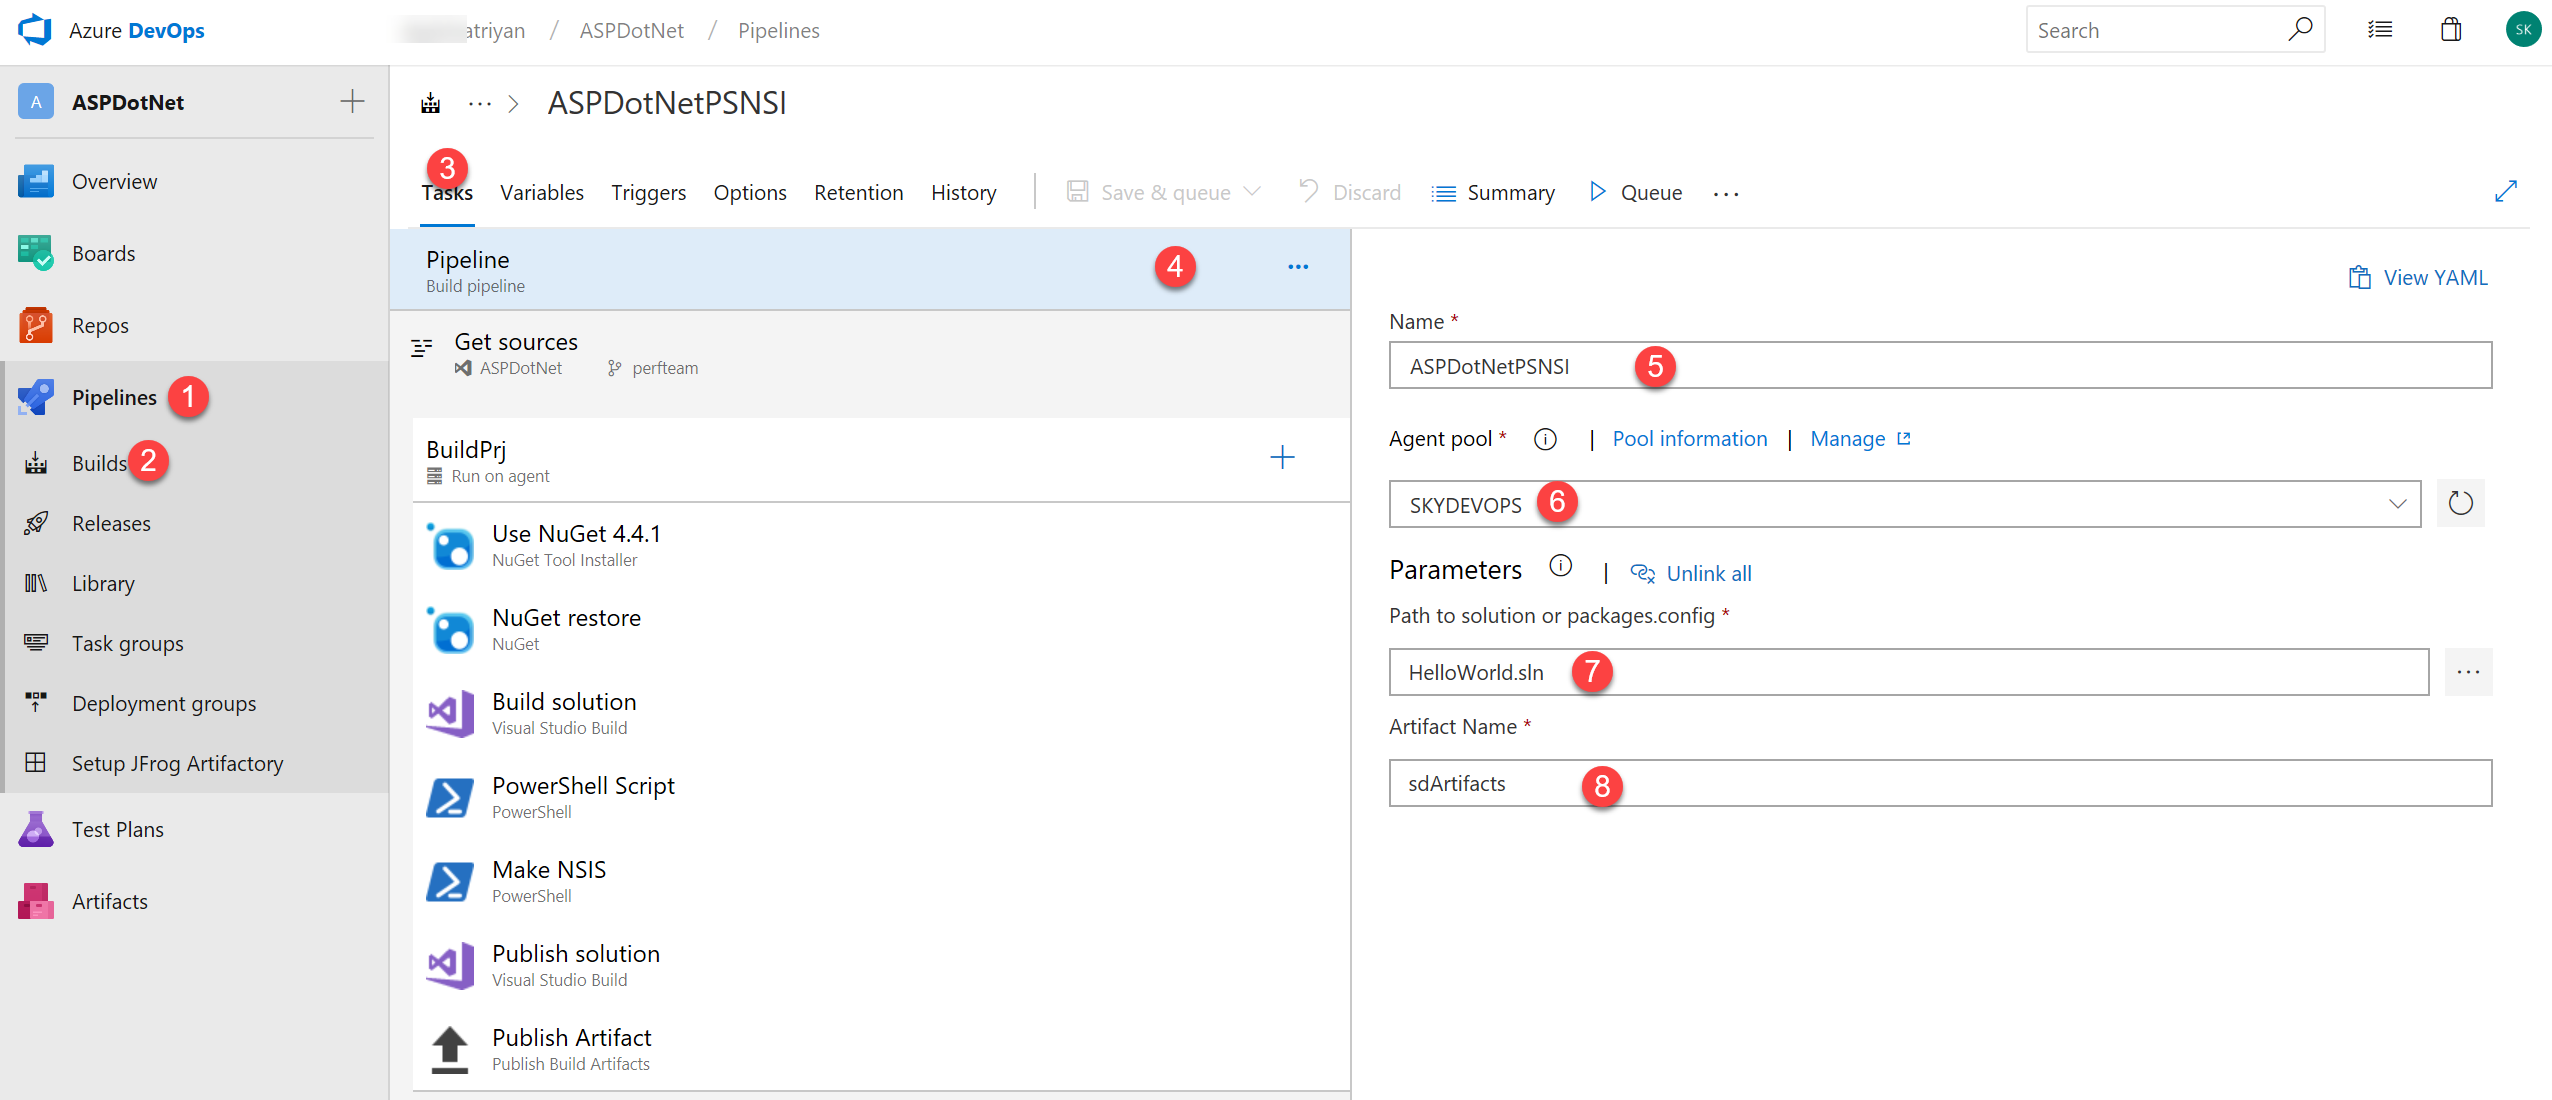
Configuration Parameters:
- Select Pipelines → Build Pipeline
- Click Tasks tab
- Select Pipeline to modify settings
- Name your build pipeline (e.g.,
ASPNet-Build-CI) - Agent Pool - Select the pool created in Step 5
- Solution Path - Reference your
.slnfile - Artifact Directory - Name for output (e.g.,
SdArtifacts)
Pipeline Naming Convention
Use descriptive names that indicate: ProjectName-PipelineType-Environment
Example: WebApp-Build-Production
Step 7: Source Configuration
Configure source control settings to determine which repository and branch to build.
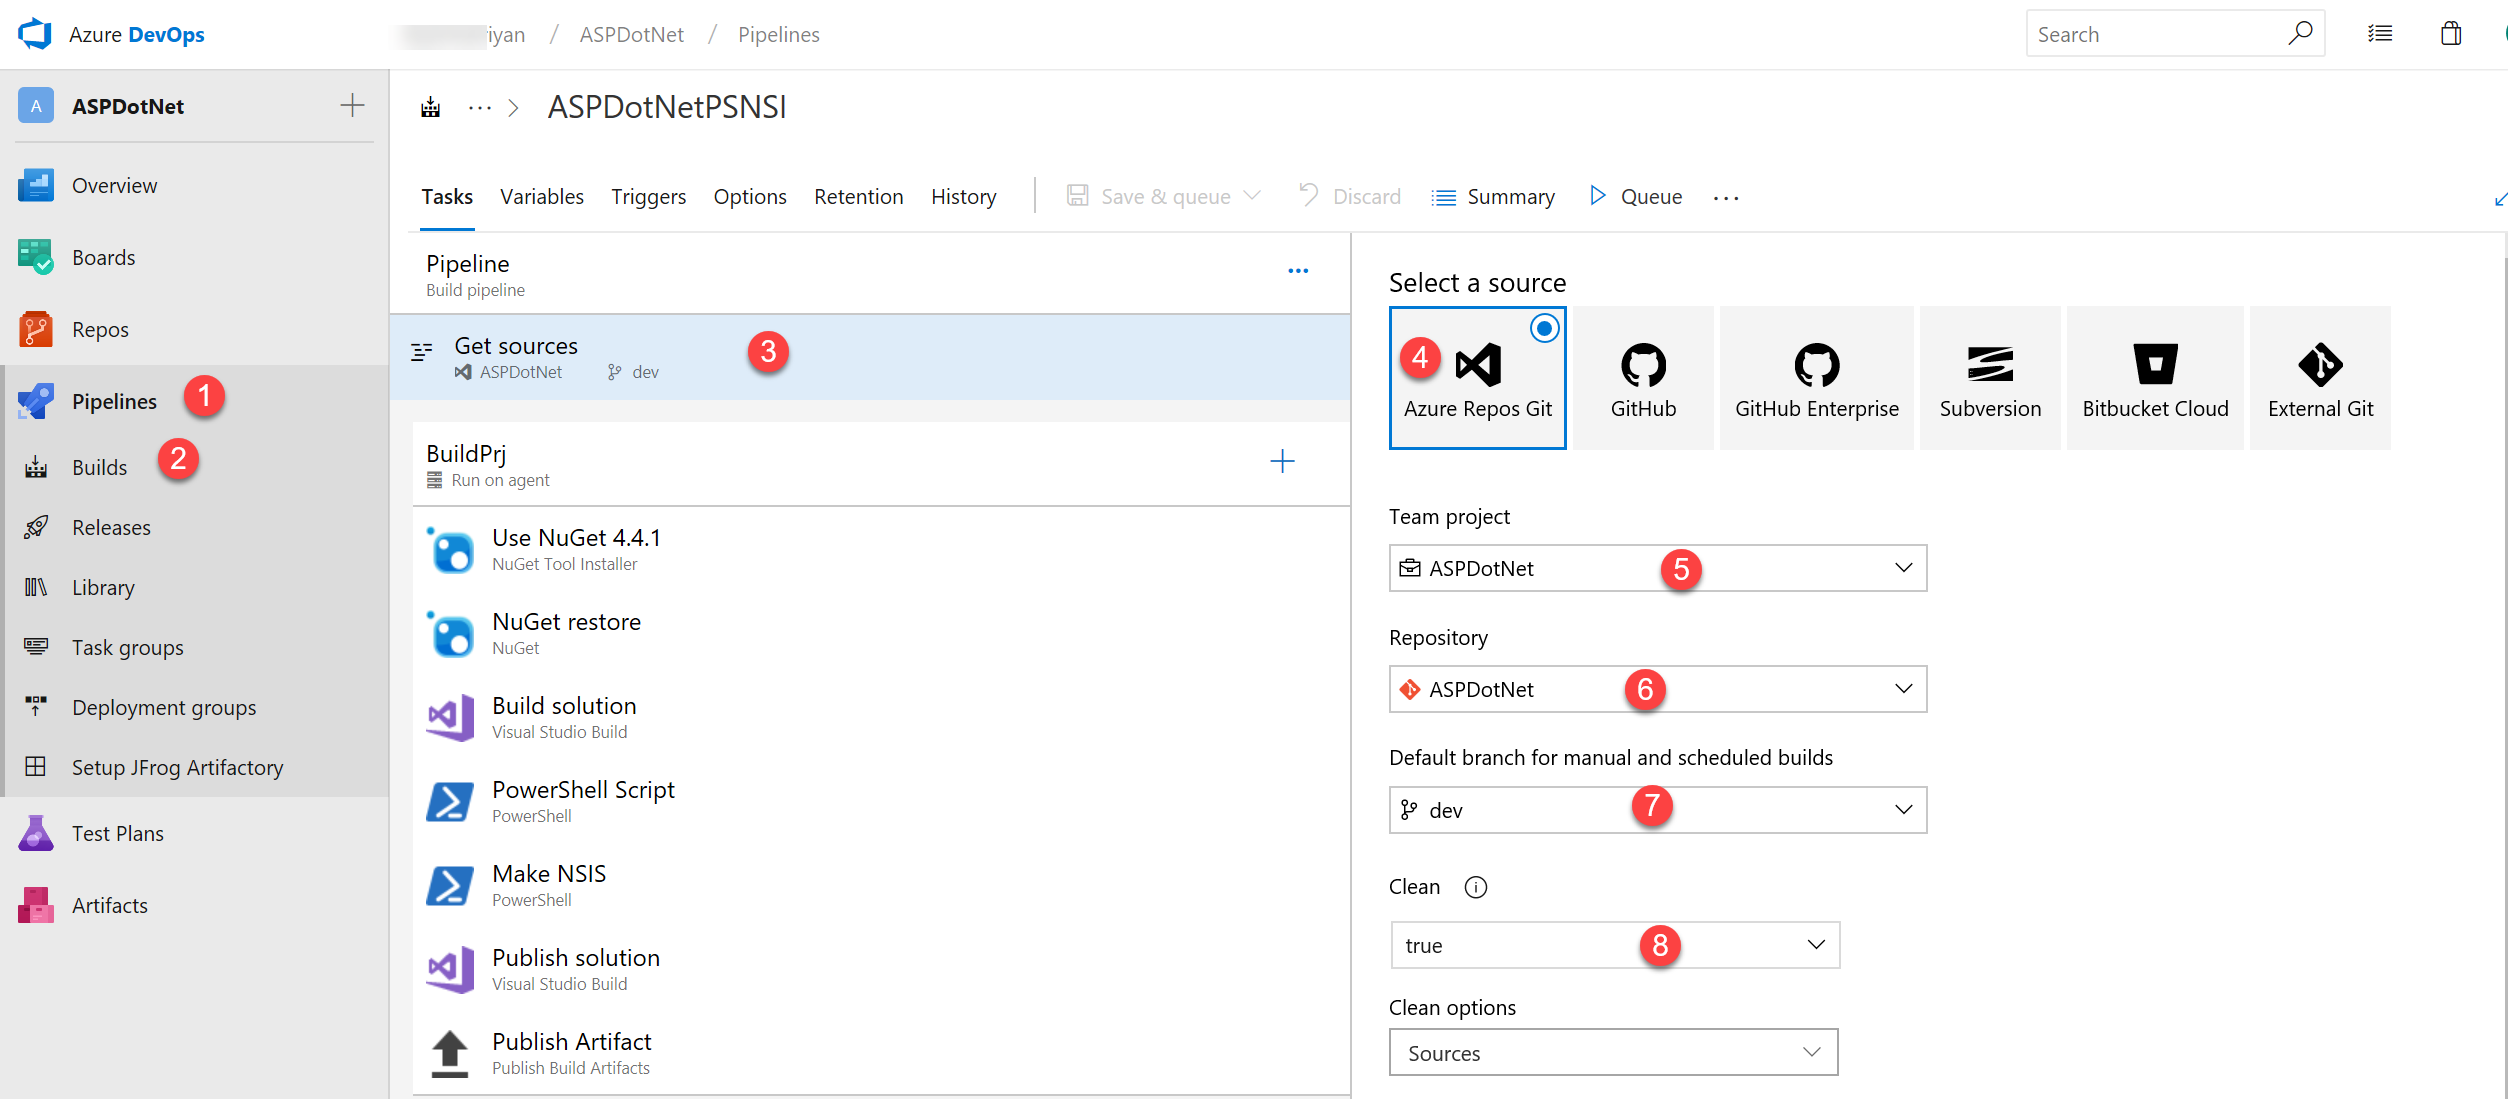
Source Settings:
- Navigate to Pipeline → Build Pipeline
- Select Get Sources task
- Choose Azure Repos Git as source type
- Select your Project from dropdown
- Choose the Repository
- Set Default Branch (typically
masterormain) - Enable Clean Build Directory option
Clean Build
Enabling clean builds ensures each build starts from a fresh state, preventing artifacts from previous builds from contaminating the current build.
Step 8: Agent Job Details
Specify which agent pool will execute your build tasks.
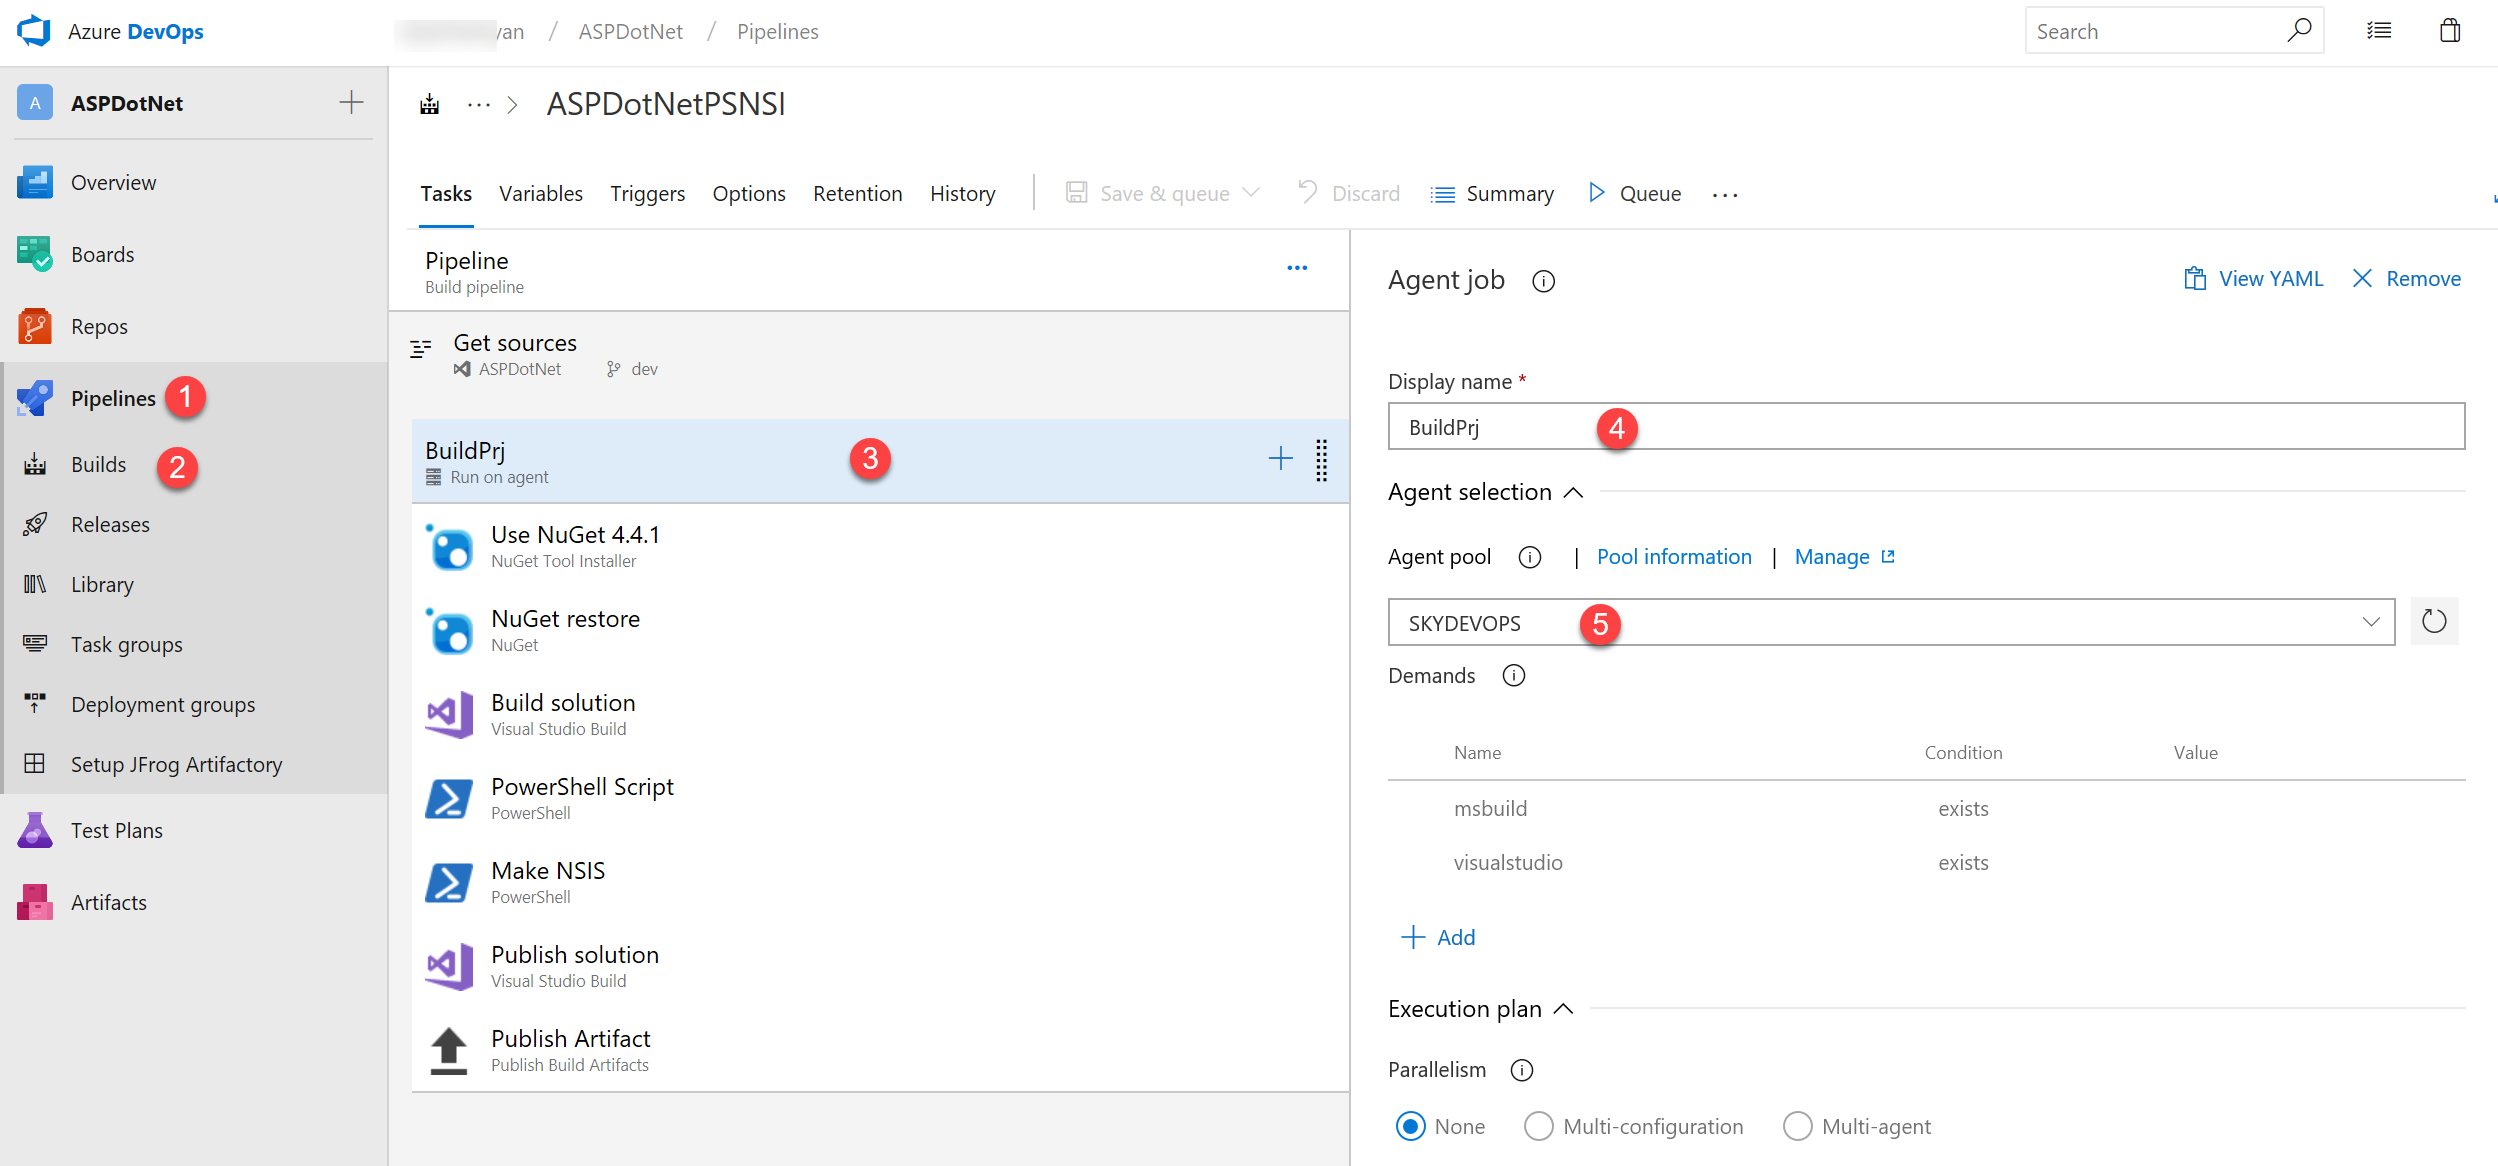
Agent Job Configuration:
- Select Pipeline → Build
- Click Run on Agent task
- Display Name - Name for this job
- Agent Pool - Select your configured pool
Step 9: NuGet Version Task
Ensure the correct NuGet version is available for package restoration.
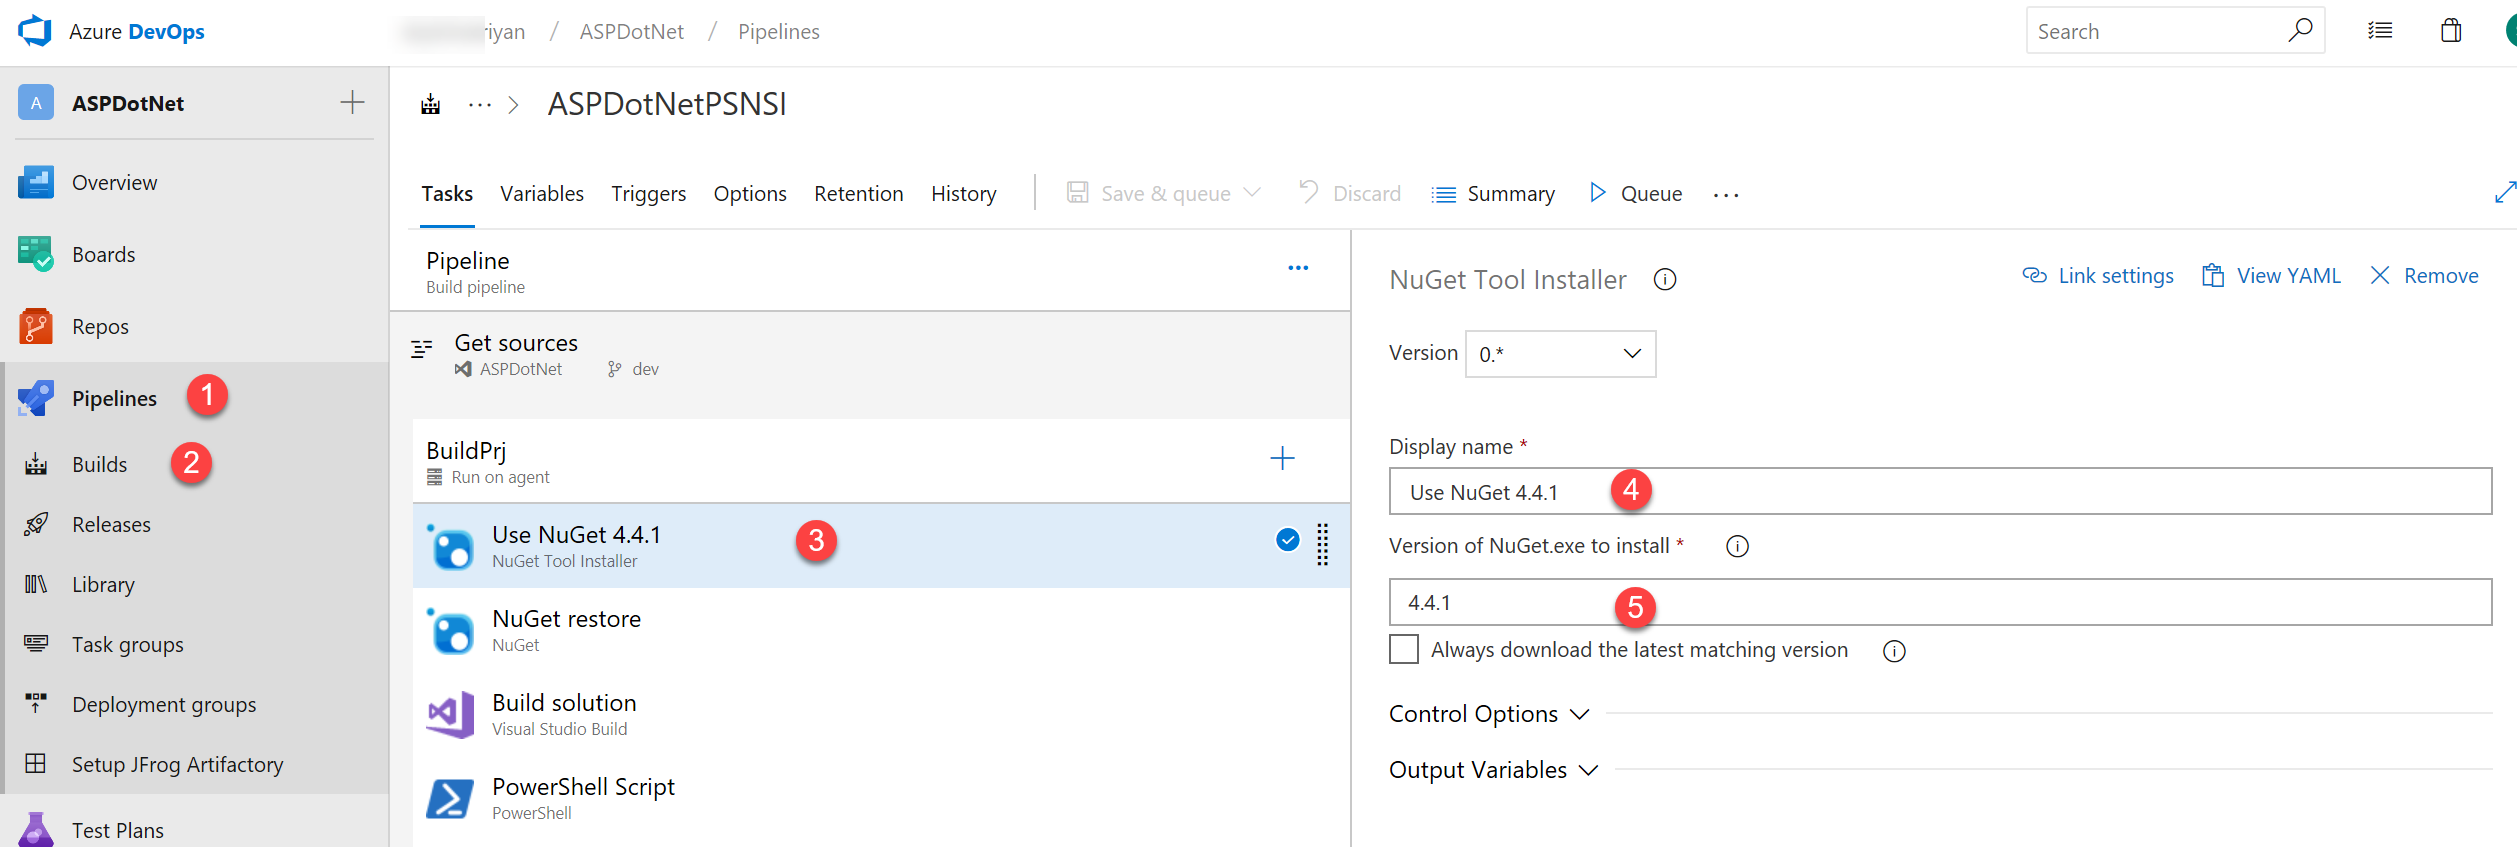
NuGet Configuration:
- Select Pipeline → Build
- Click Use NuGet task
- Display Name - Task identifier
- Version - Select NuGet version (recommend latest)
NuGet Versions
Using the latest NuGet version ensures compatibility with modern package formats and security updates.
Step 10: Restore NuGet Packages
Restore all project dependencies before building.
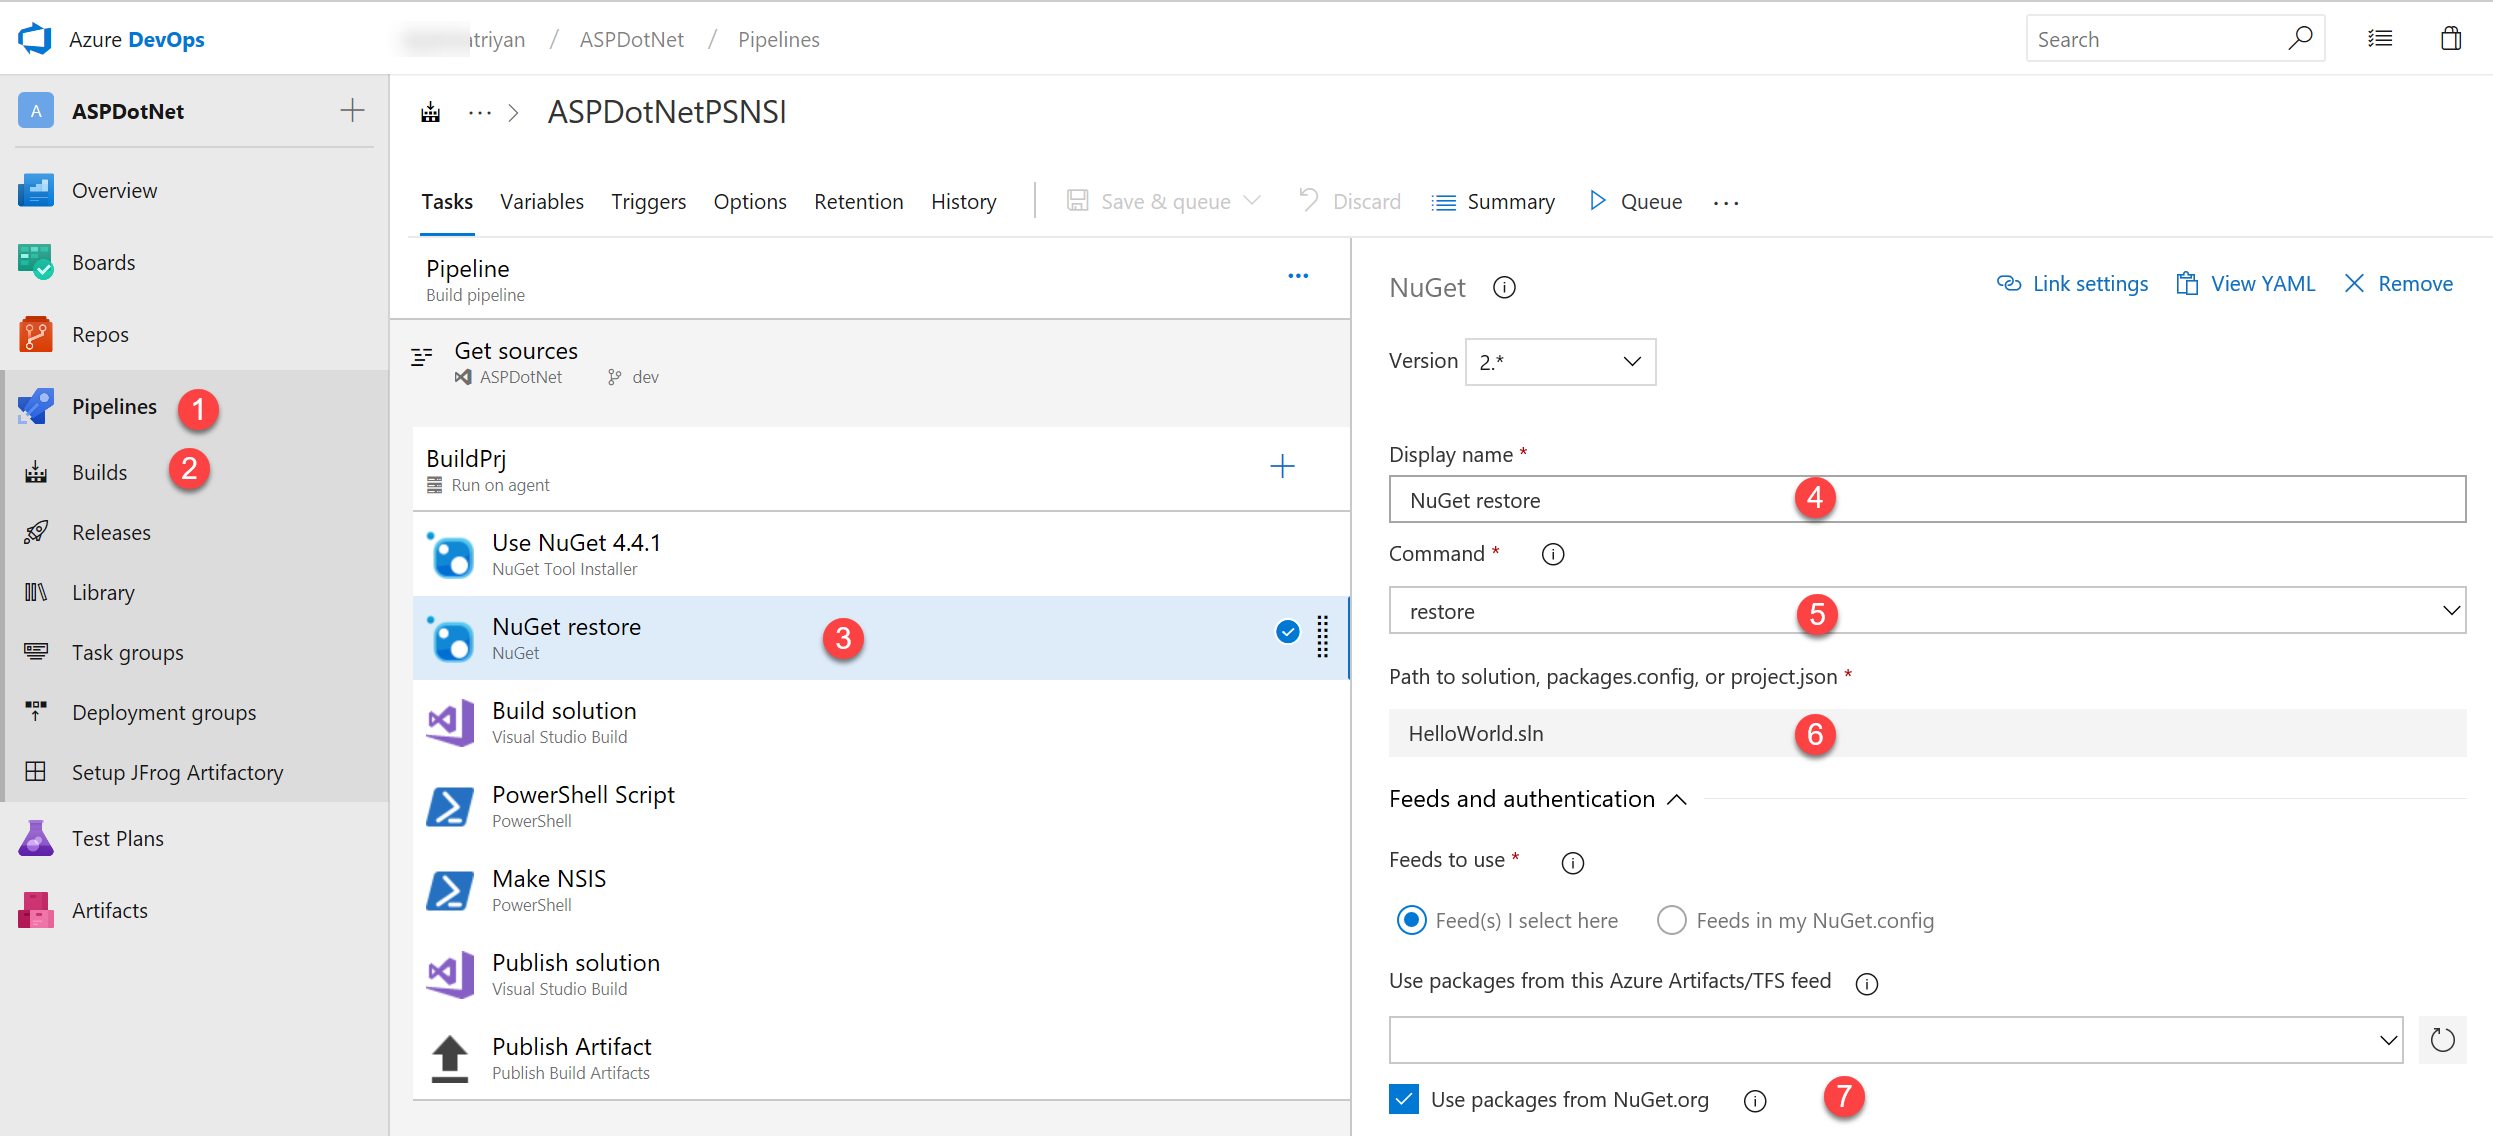
Restore Configuration:
- Select Pipeline → Build
- Click NuGet Restore task
- Display Name - Name the task
- Command - Set to
restore - Solution Path - Verify
.slnfile path - Feeds - Use packages from NuGet.org
Custom NuGet Feeds
If you use private package feeds:
Step 11: Build Solution
Compile your ASP.NET solution with specified configuration.
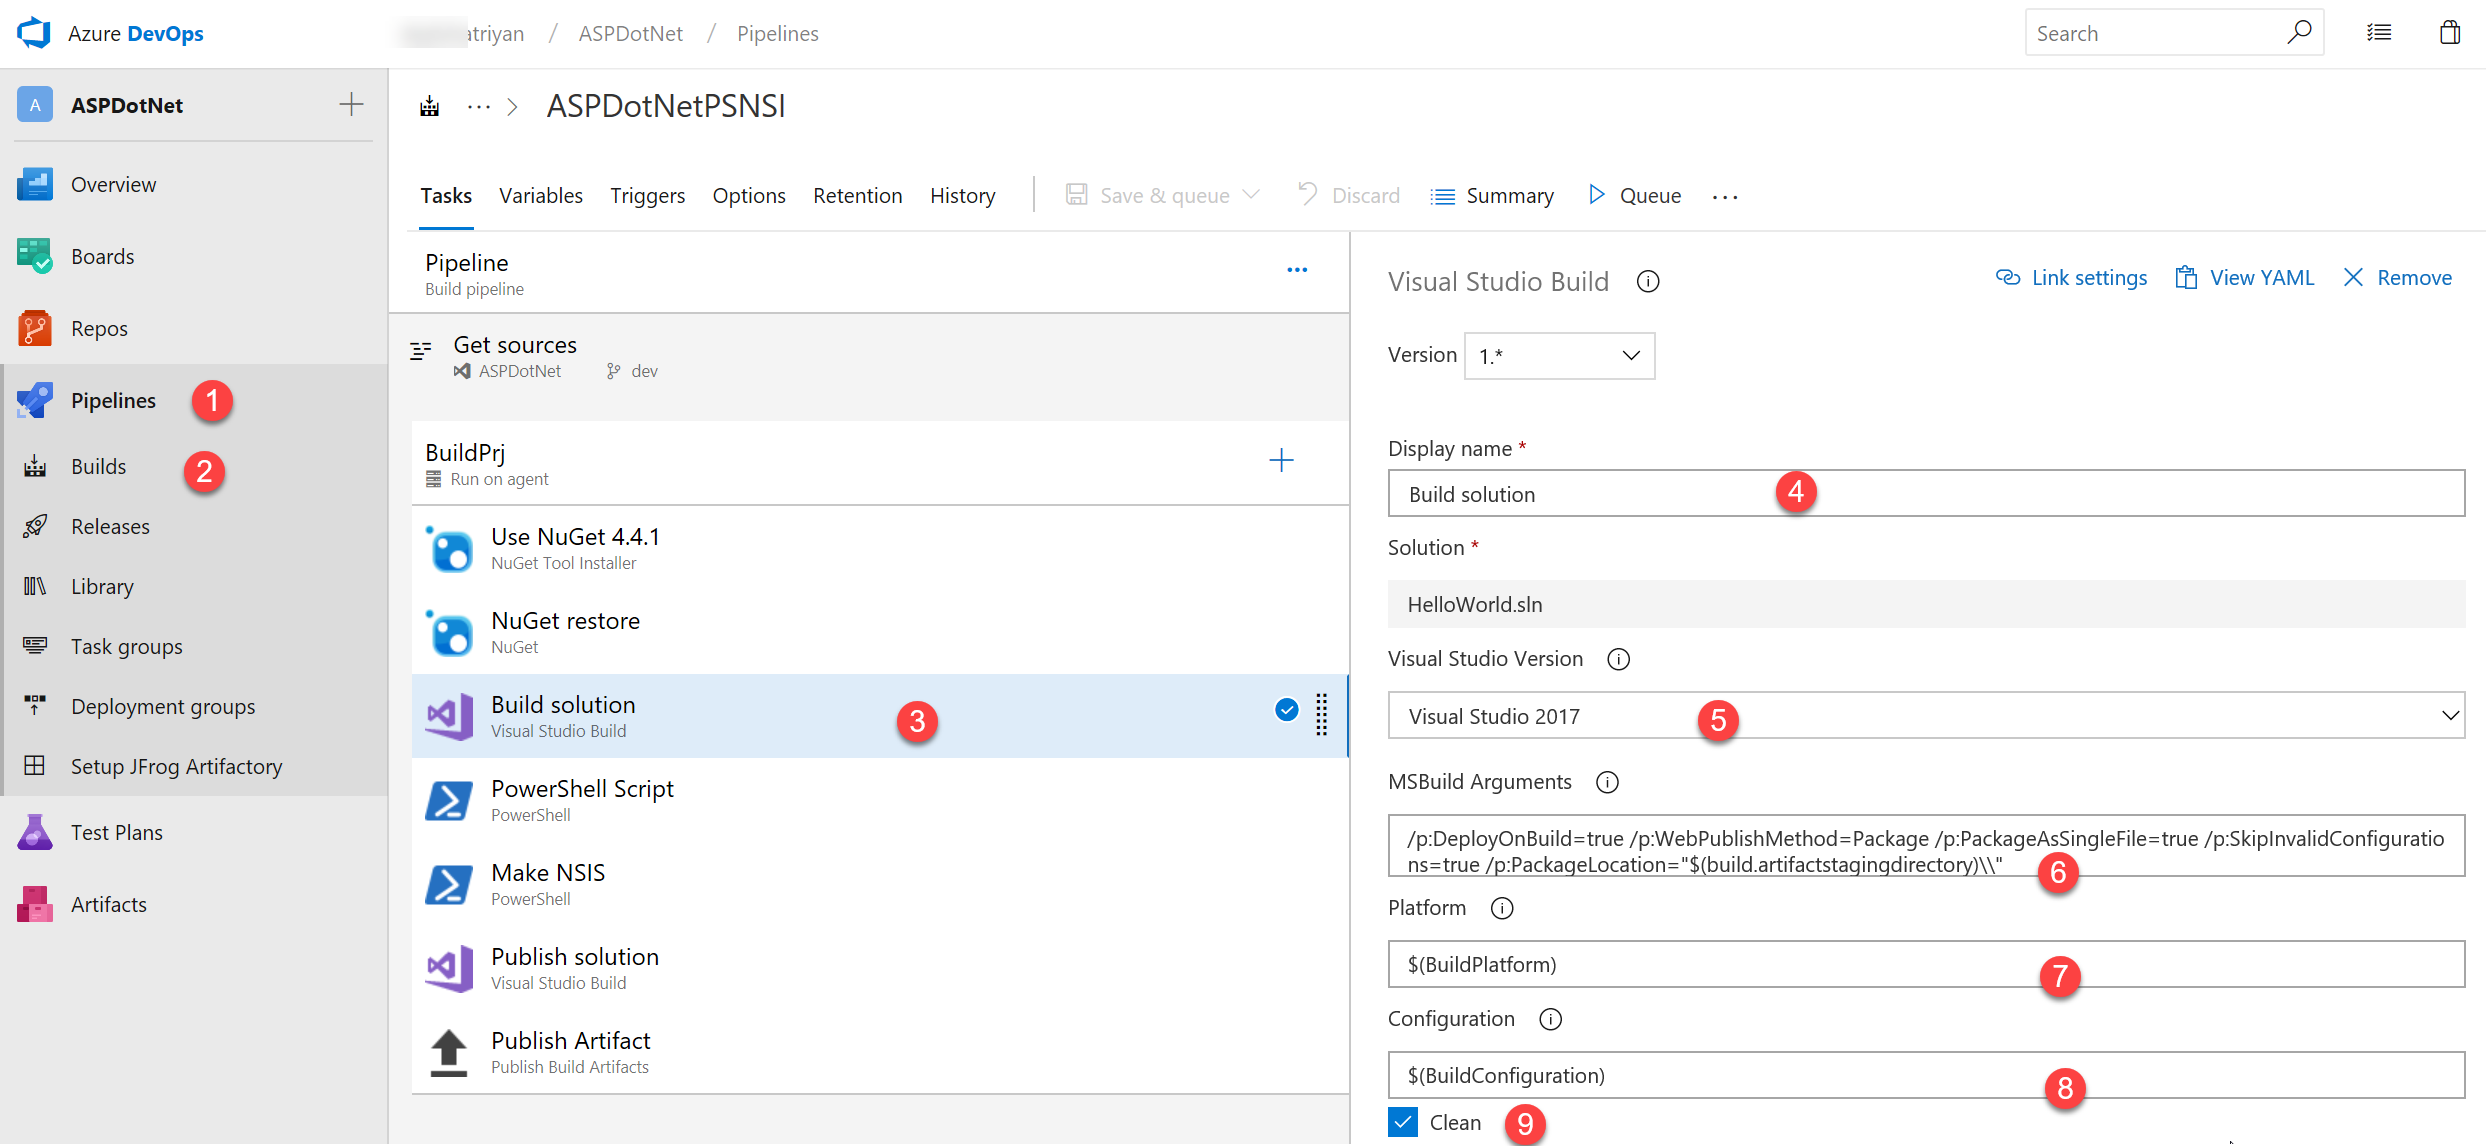
Build Configuration:
- Select Pipeline → Build
- Click Build Solution task
- Display Name - Task name
- Visual Studio Version - Select appropriate version
- MSBuild Arguments - Additional build parameters
- Platform - Usually
Any CPU - Configuration -
ReleaseorDebug
Build Arguments
Common MSBuild arguments:
Step 12: Create Executable with MAKE NSIS
Use PowerShell to extract Git tags and build Windows installers.
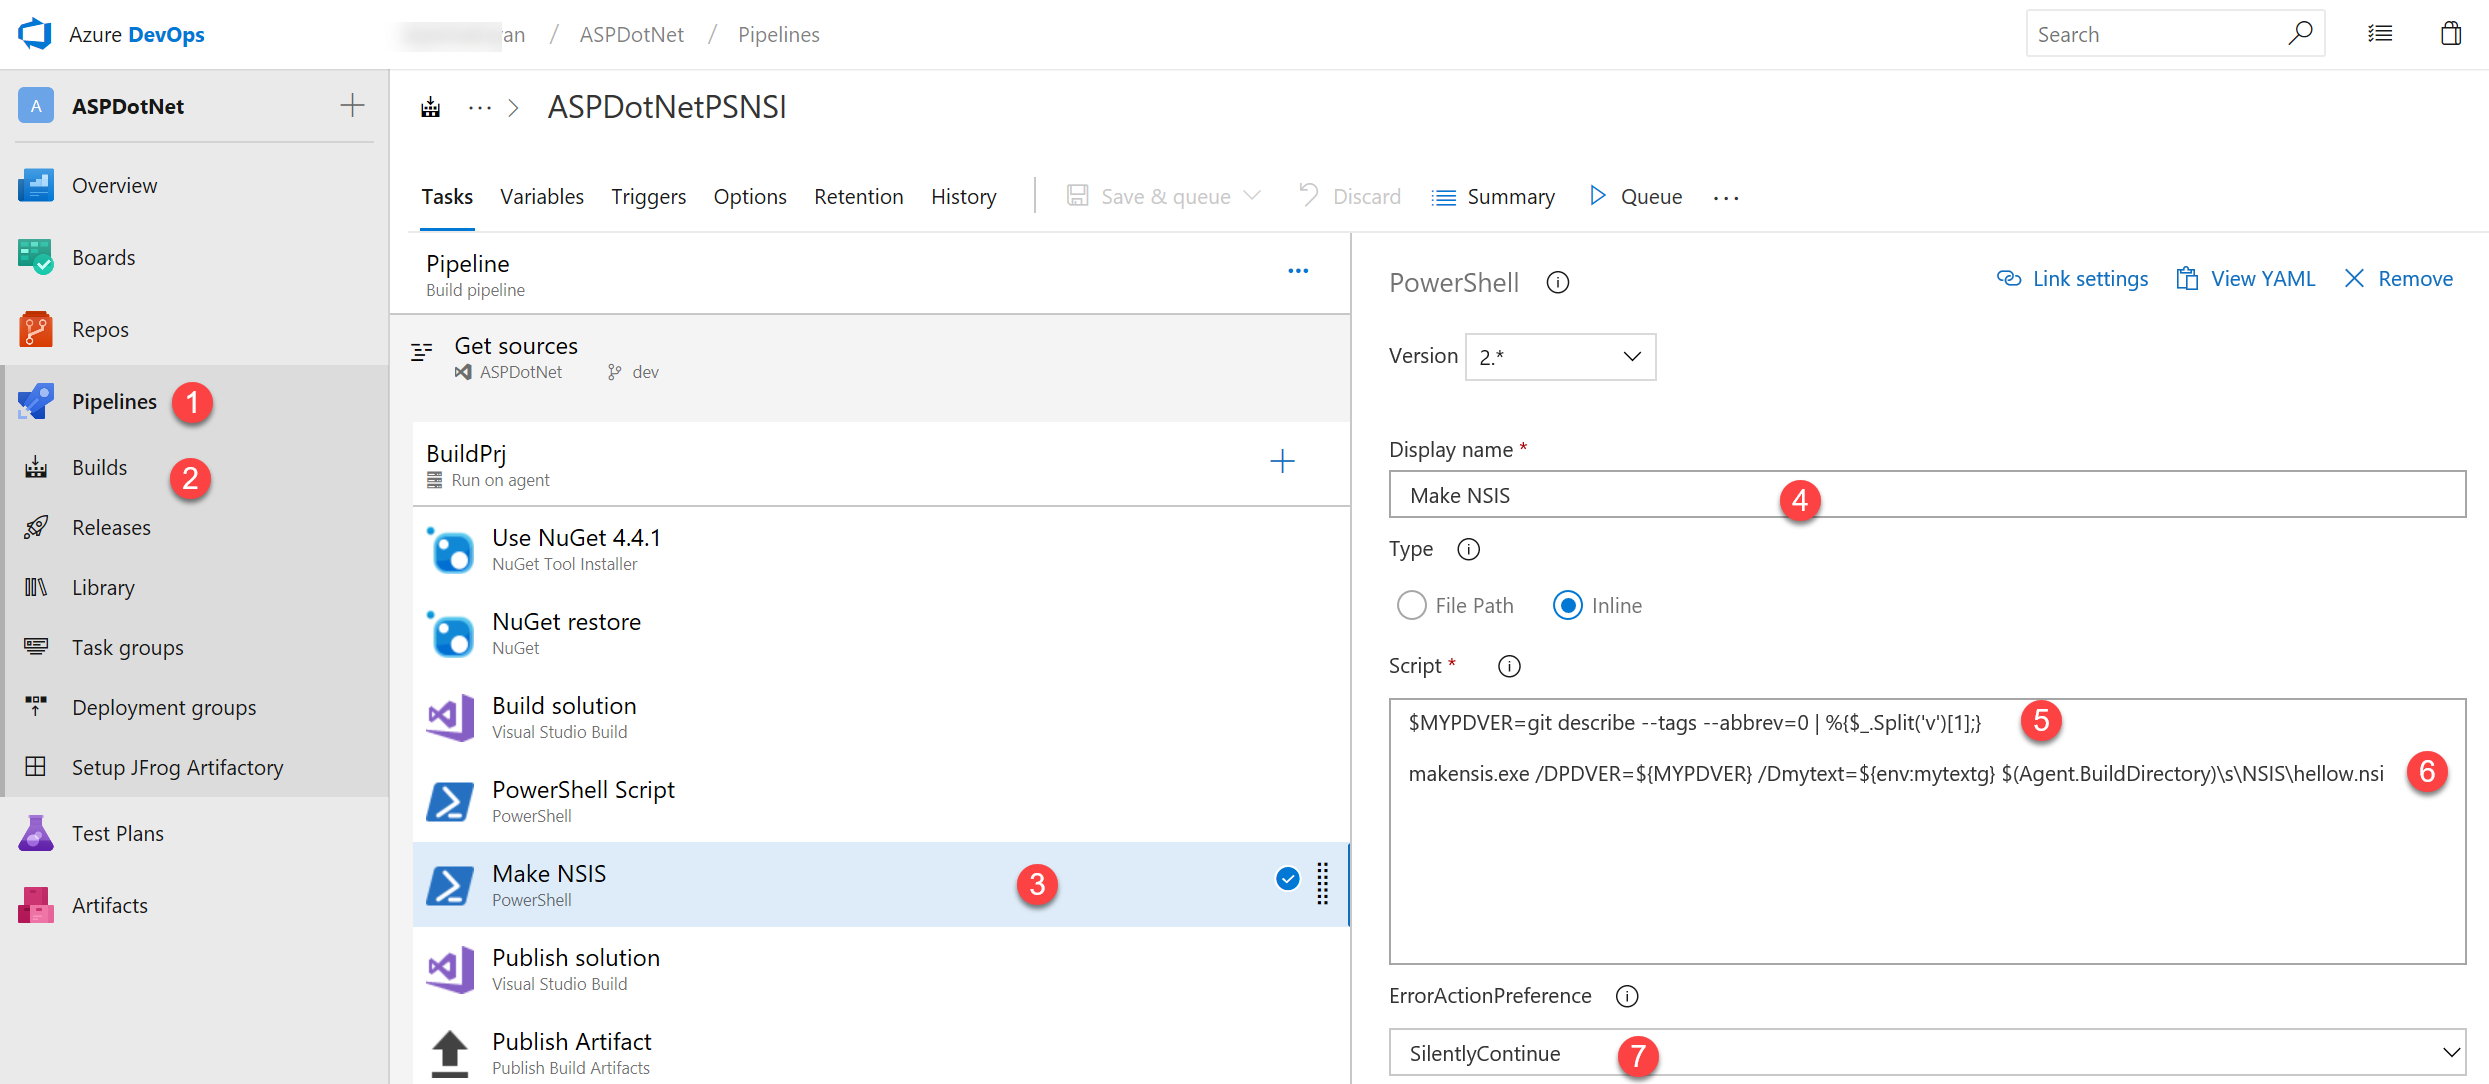
PowerShell Script Task:
- Select Pipeline → Build
- Add PowerShell Script task
- Display Name -
Create Installer - Script Type - Inline
- Inline Script - Version extraction and MAKENSIS command
- Error Action -
SilentlyContinue
PowerShell Version Extraction Script
Step 13: Publish Solution
Prepare the solution for deployment by publishing to a specific output directory.
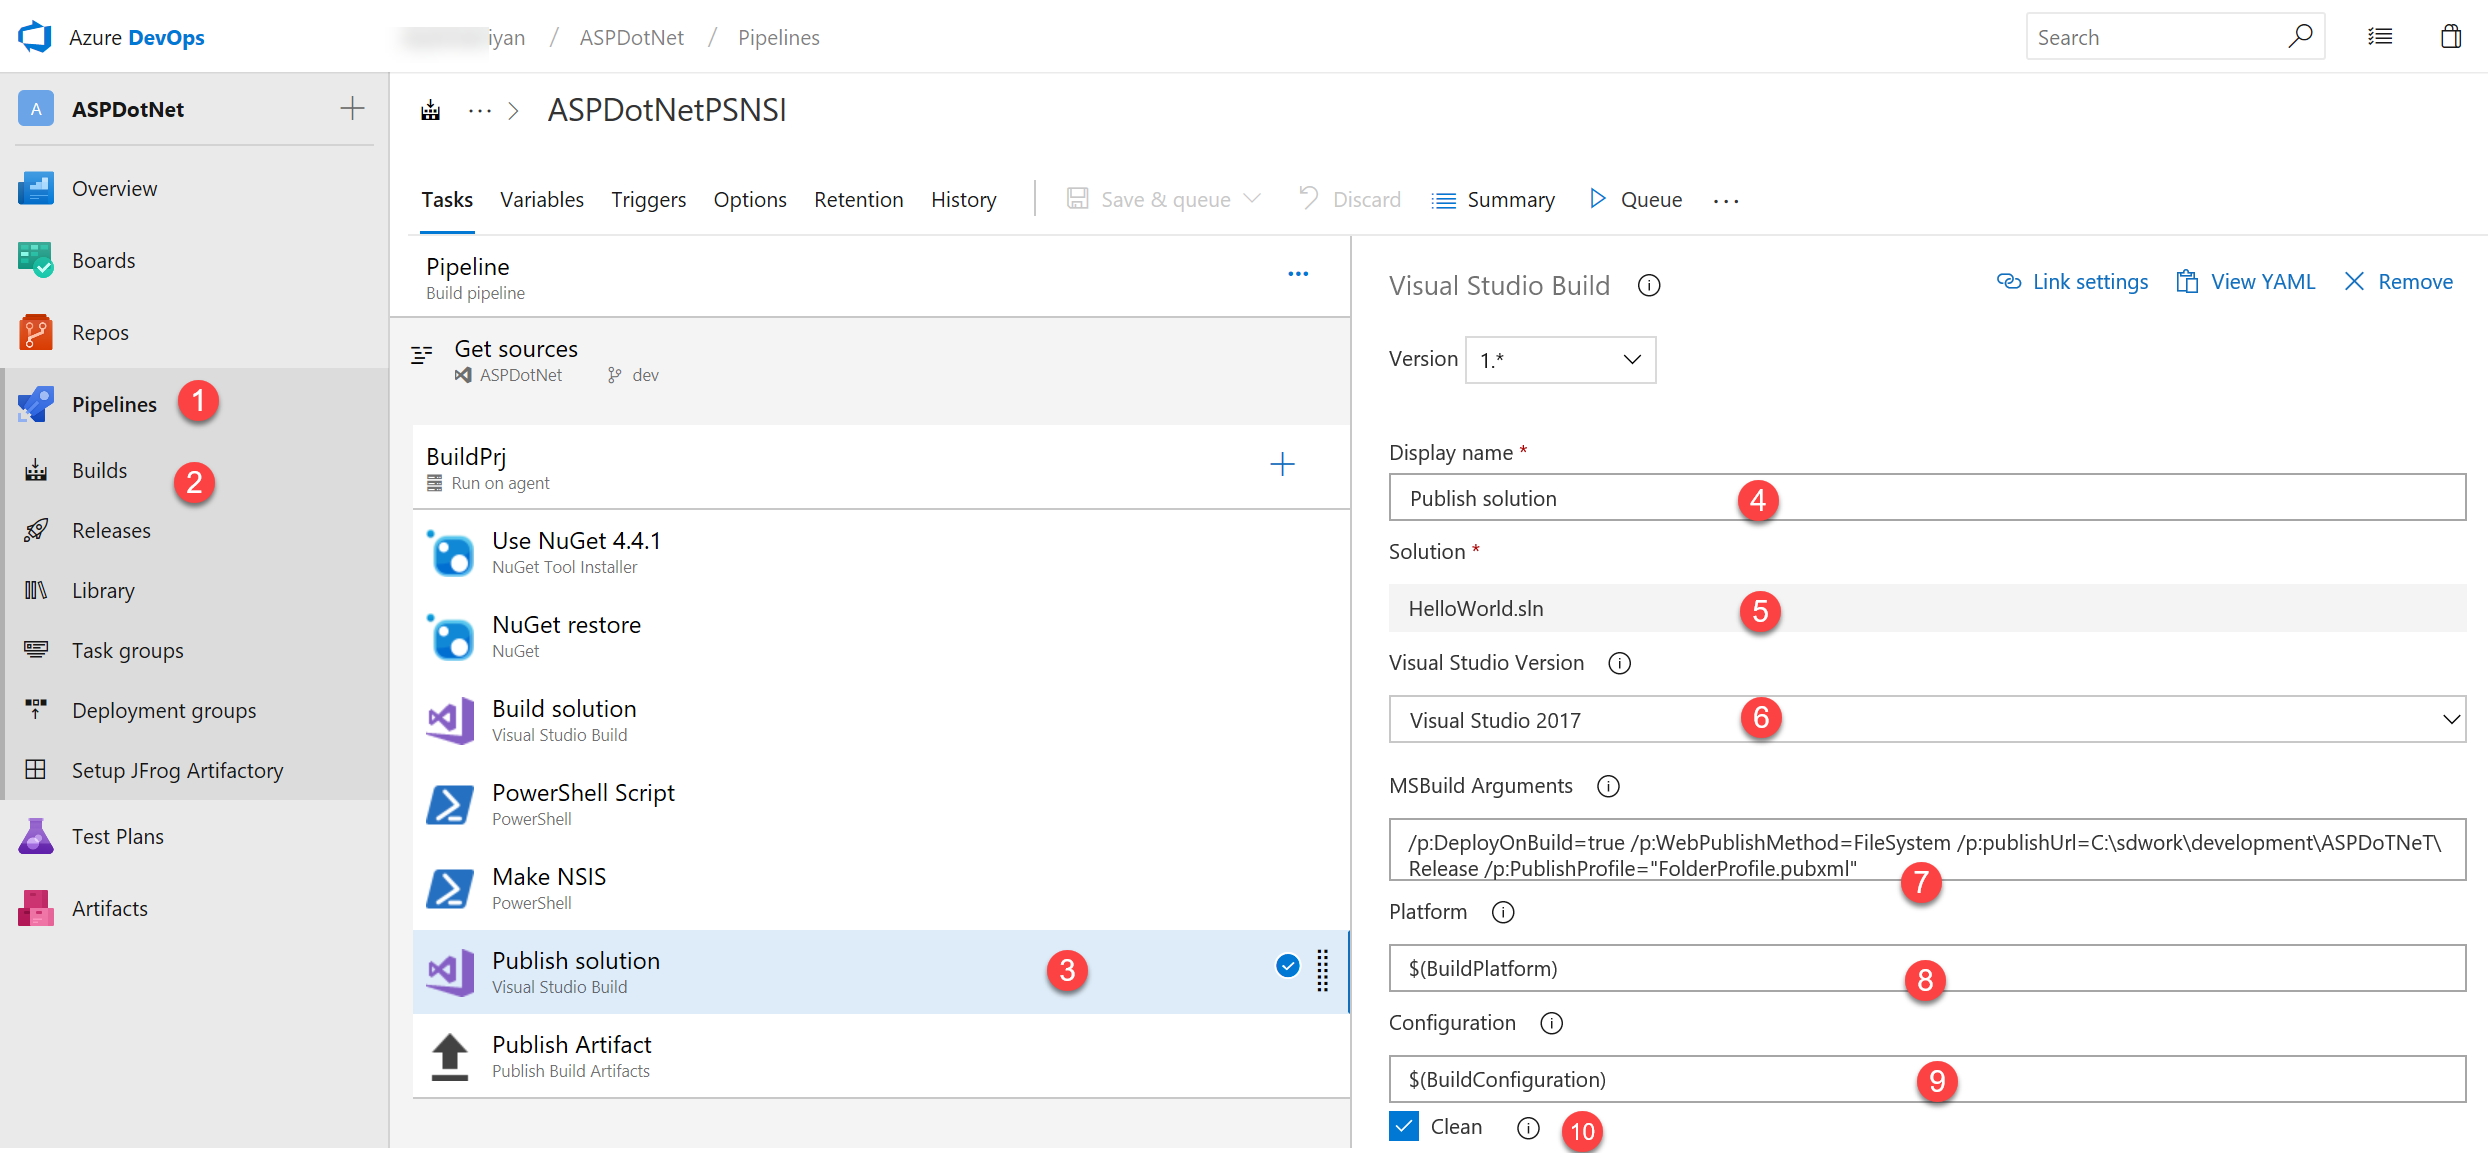
Publish Configuration:
- Select Pipeline → Build
- Click Build Solution task (configure for publish)
- Display Name -
Publish Solution - Solution Path - Verify
.slnfile - Visual Studio Version - Match build version
- MSBuild Arguments - Include publish profile:
- Platform -
Any CPU - Configuration -
Release - Clean - Enable to clean before publish
Publish Profiles
Publish profiles (.pubxml files) define how and where your application is published. Store these in your solution's Properties/PublishProfiles/ folder.
Step 14: Publish Build Artifacts
Make build outputs available for release pipelines.
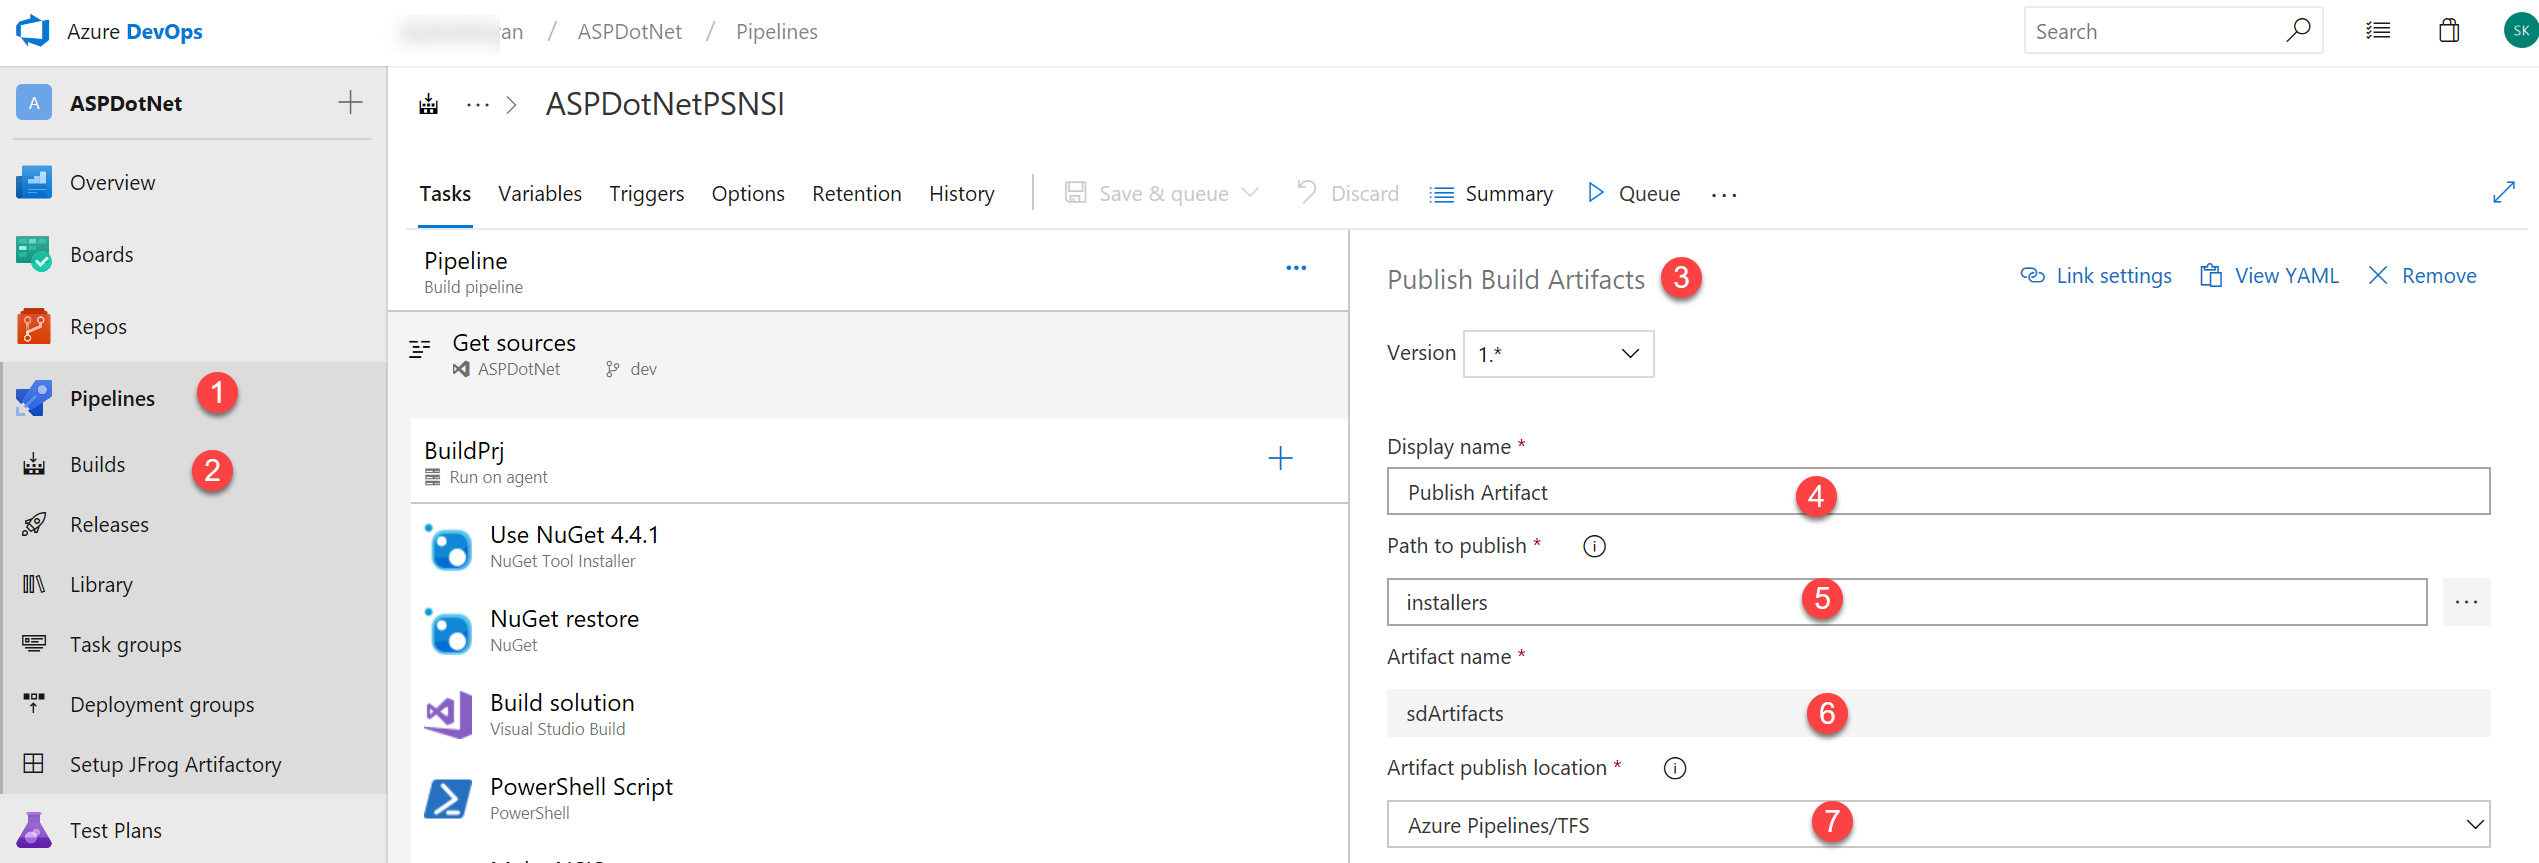
Artifact Configuration:
- Select Pipeline → Build
- Add Publish Artifacts task
- Display Name -
Publish Artifacts - Path to Publish - Source directory path
- Artifact Name - Match directory from Step 6 (e.g.,
SdArtifacts) - Artifact Type -
Azure Pipelines
Artifact Storage
Artifacts are stored in Azure DevOps for the retention period defined in your project settings (default: 30 days).
Step 15: Pipeline Variables
Define reusable variables for your build pipeline.
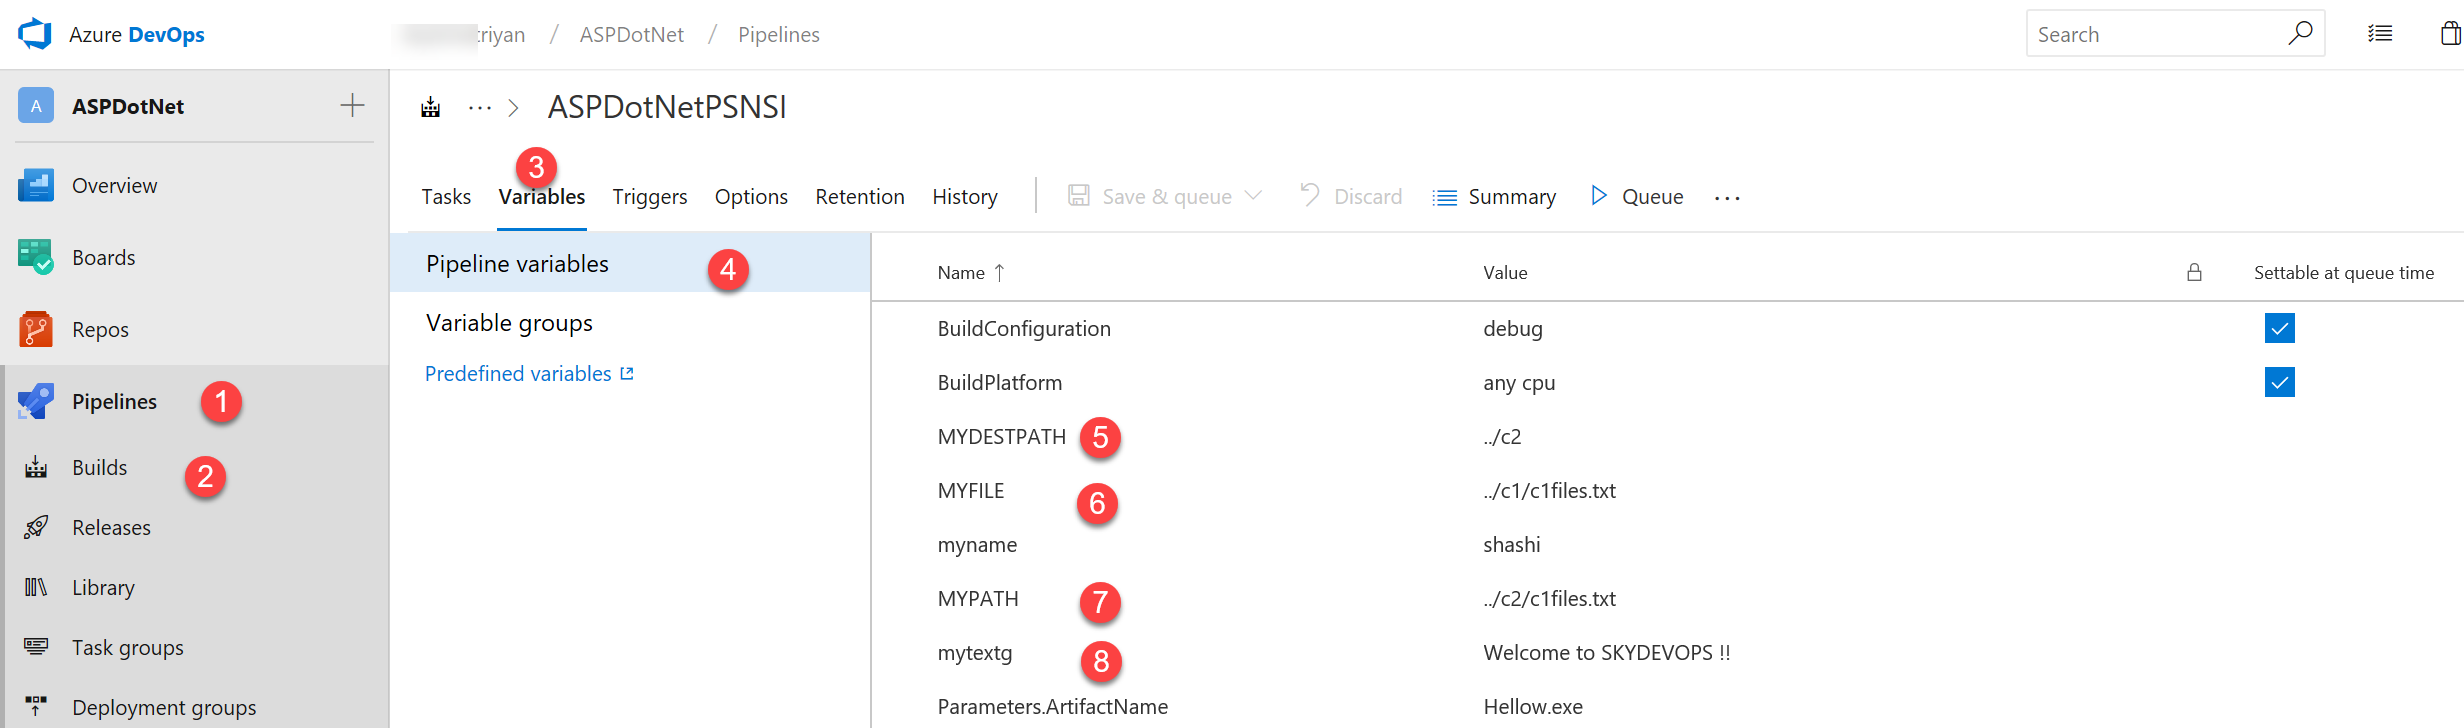
Variable Configuration:
- Select Pipeline → Build
- Click Variables tab
- Select Pipeline Variables
- Add variables in Key:Value format
Common Pipeline Variables
| Variable Name | Example Value | Description |
|---|---|---|
BuildConfiguration | Release | Build configuration mode |
BuildPlatform | Any CPU | Target platform |
ArtifactDirectory | $(Build.ArtifactStagingDirectory) | Output path |
SolutionPath | **/*.sln | Solution file path |
Step 16: Build Triggers
Configure when builds are automatically triggered.
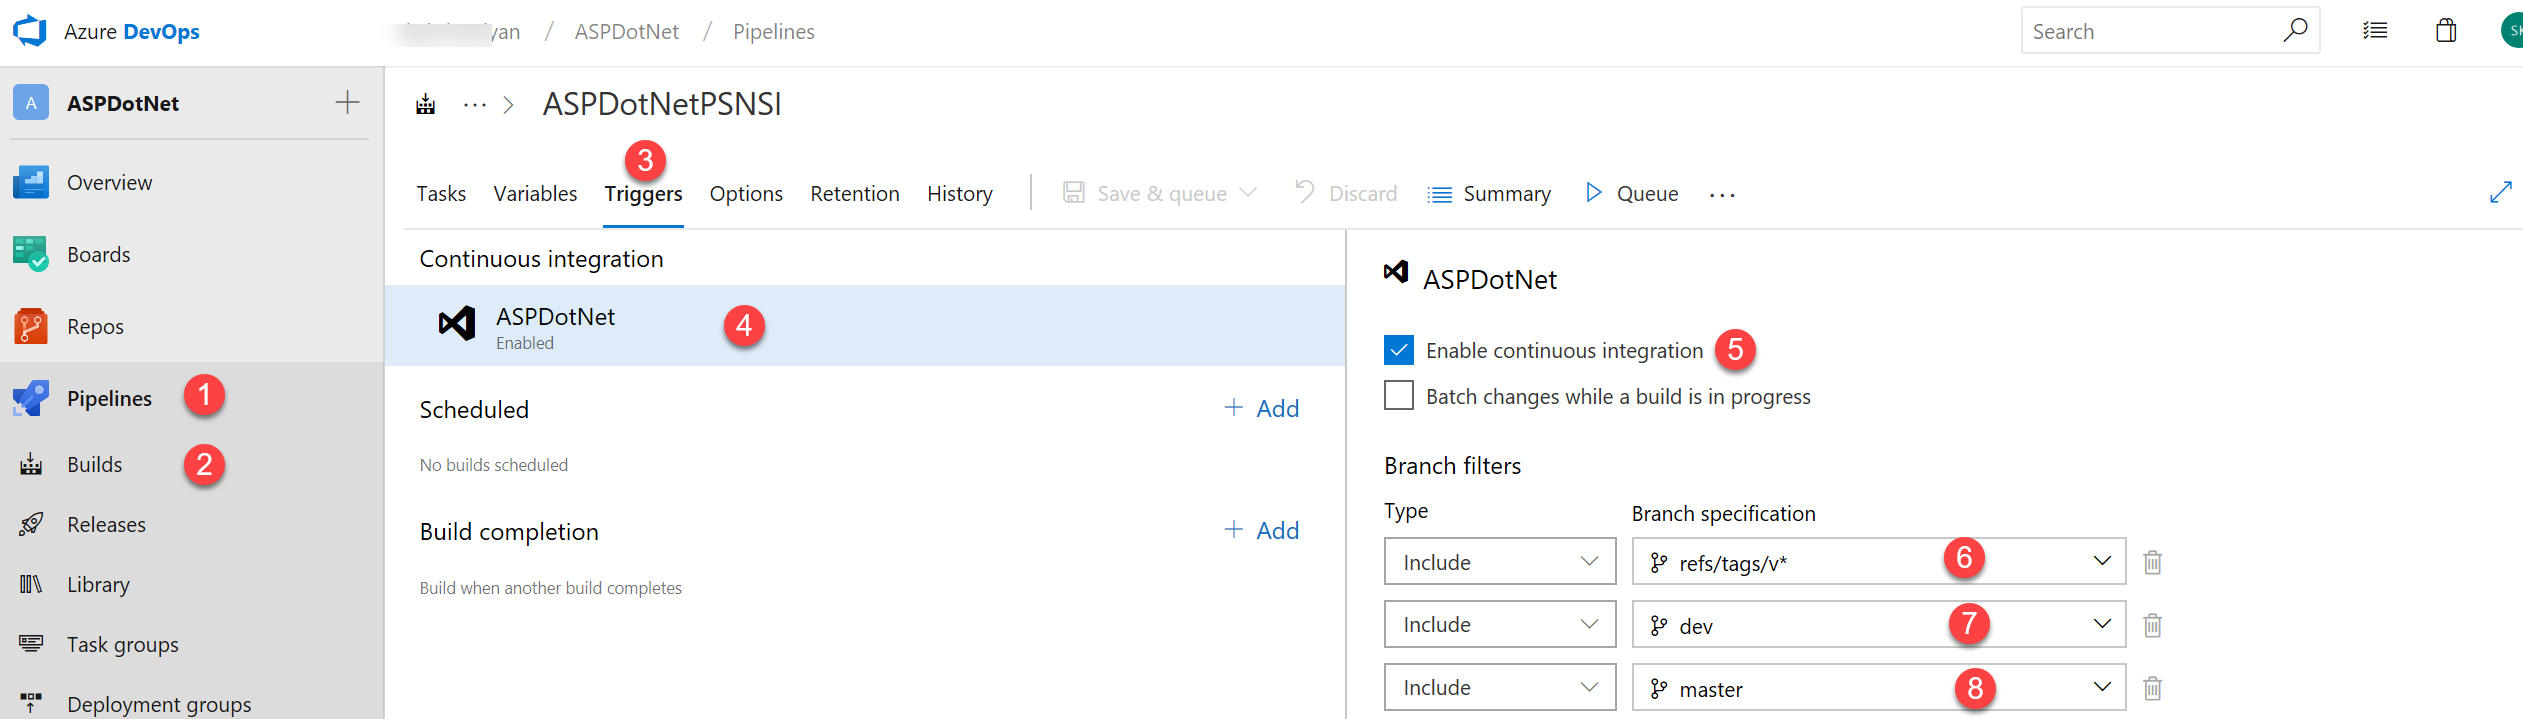
Trigger Configuration:
- Select Pipeline → Build
- Click Triggers tab
- Select your Project
- Enable Continuous Integration
- Add branch filters:
refs/tags/v*- Trigger on version tagsdev- Trigger on dev branch commitsmaster- Trigger on master branch commits
Branch Strategies
Use different trigger patterns for different workflows:
- Development: Trigger on every commit to
dev - Staging: Trigger on tags matching
v*-rc* - Production: Trigger only on final release tags
v*
Step 17: Build History
Monitor your build execution history and success rates.
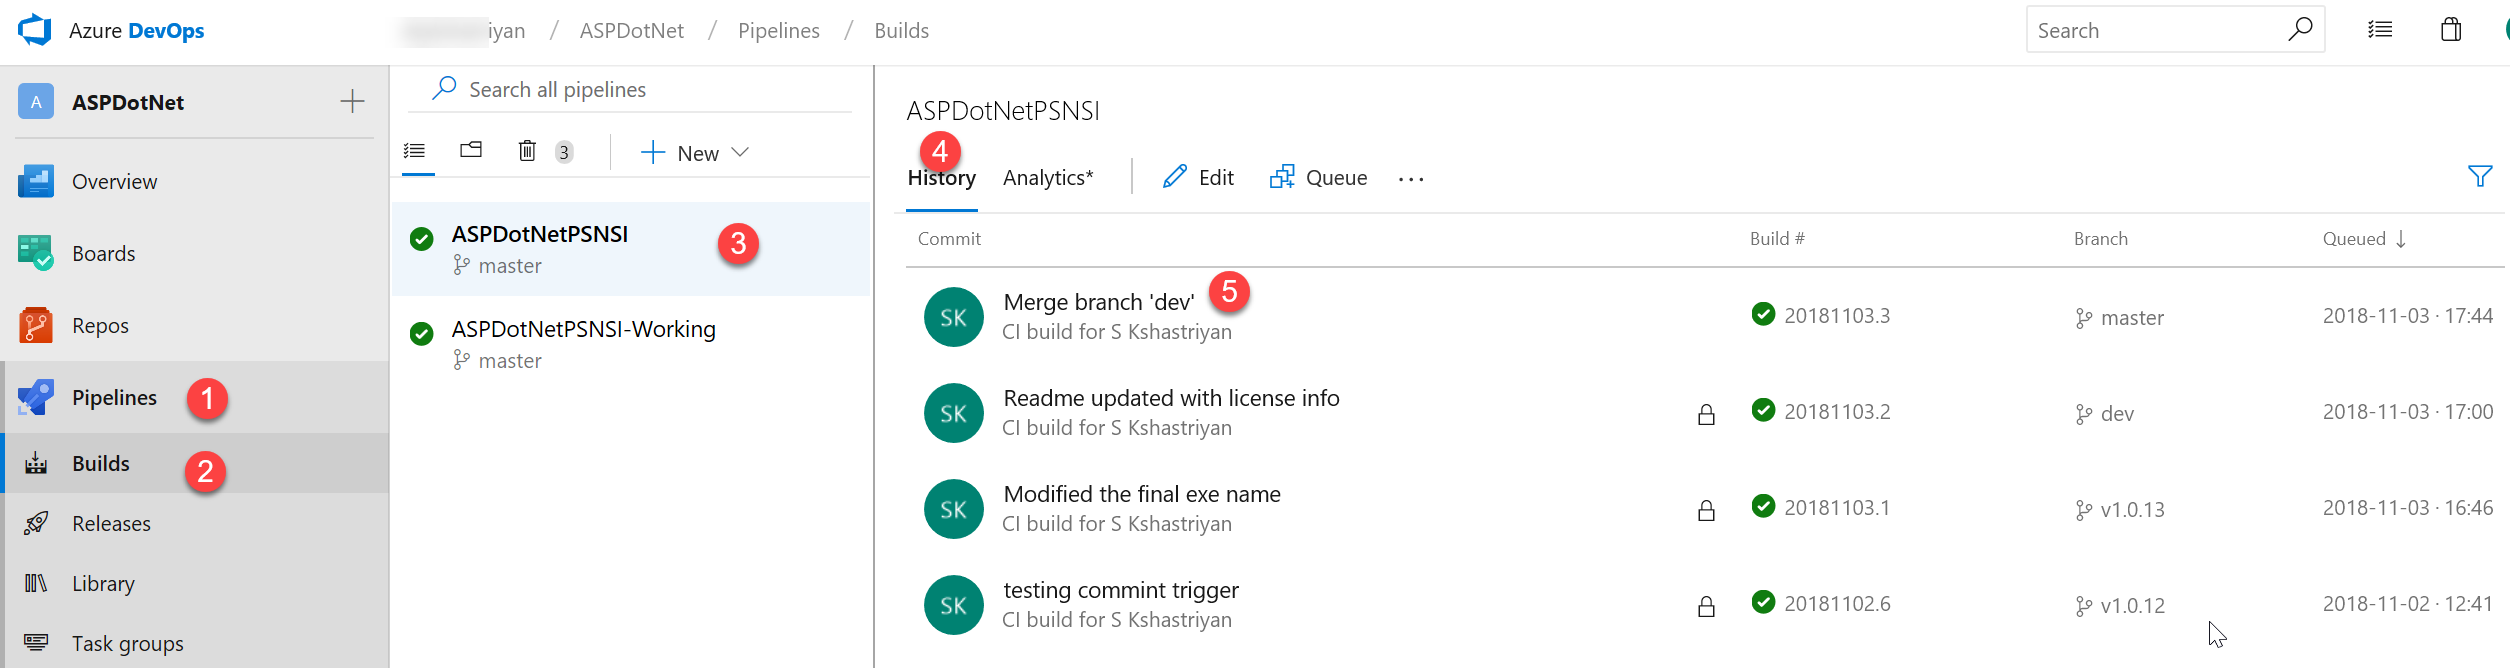
History View:
- Select Pipeline → Build
- Select your project
- Click History tab to view all builds
Information Available:
- Build number and timestamp
- Triggered by (manual or CI)
- Branch or tag that triggered the build
- Build duration
- Success/failure status
- Agent used
Build Retention
Configure retention policies in Project Settings to automatically clean up old builds while preserving important releases.
Part 4: Release Pipeline Configuration
graph LR
    A[Artifacts] --> B{Trigger Conditions}
    B -->|Dev Branch| C[Deploy to QA]
    B -->|Tag v*| D[Deploy to Stage]
    B -->|PR to Master| E[Deploy to Prod]

    C --> F[QA Environment]
    D --> G[Stage Environment]
    E --> H[Production Environment]

    style A fill:#0000FF
    style C fill:#FFA500
    style D fill:#D2691E
    style E fill:#FF69B4
    style H fill:#008000
Step 18: Release Pipeline Setup
Create a multi-stage release pipeline for QA, Staging, and Production environments.
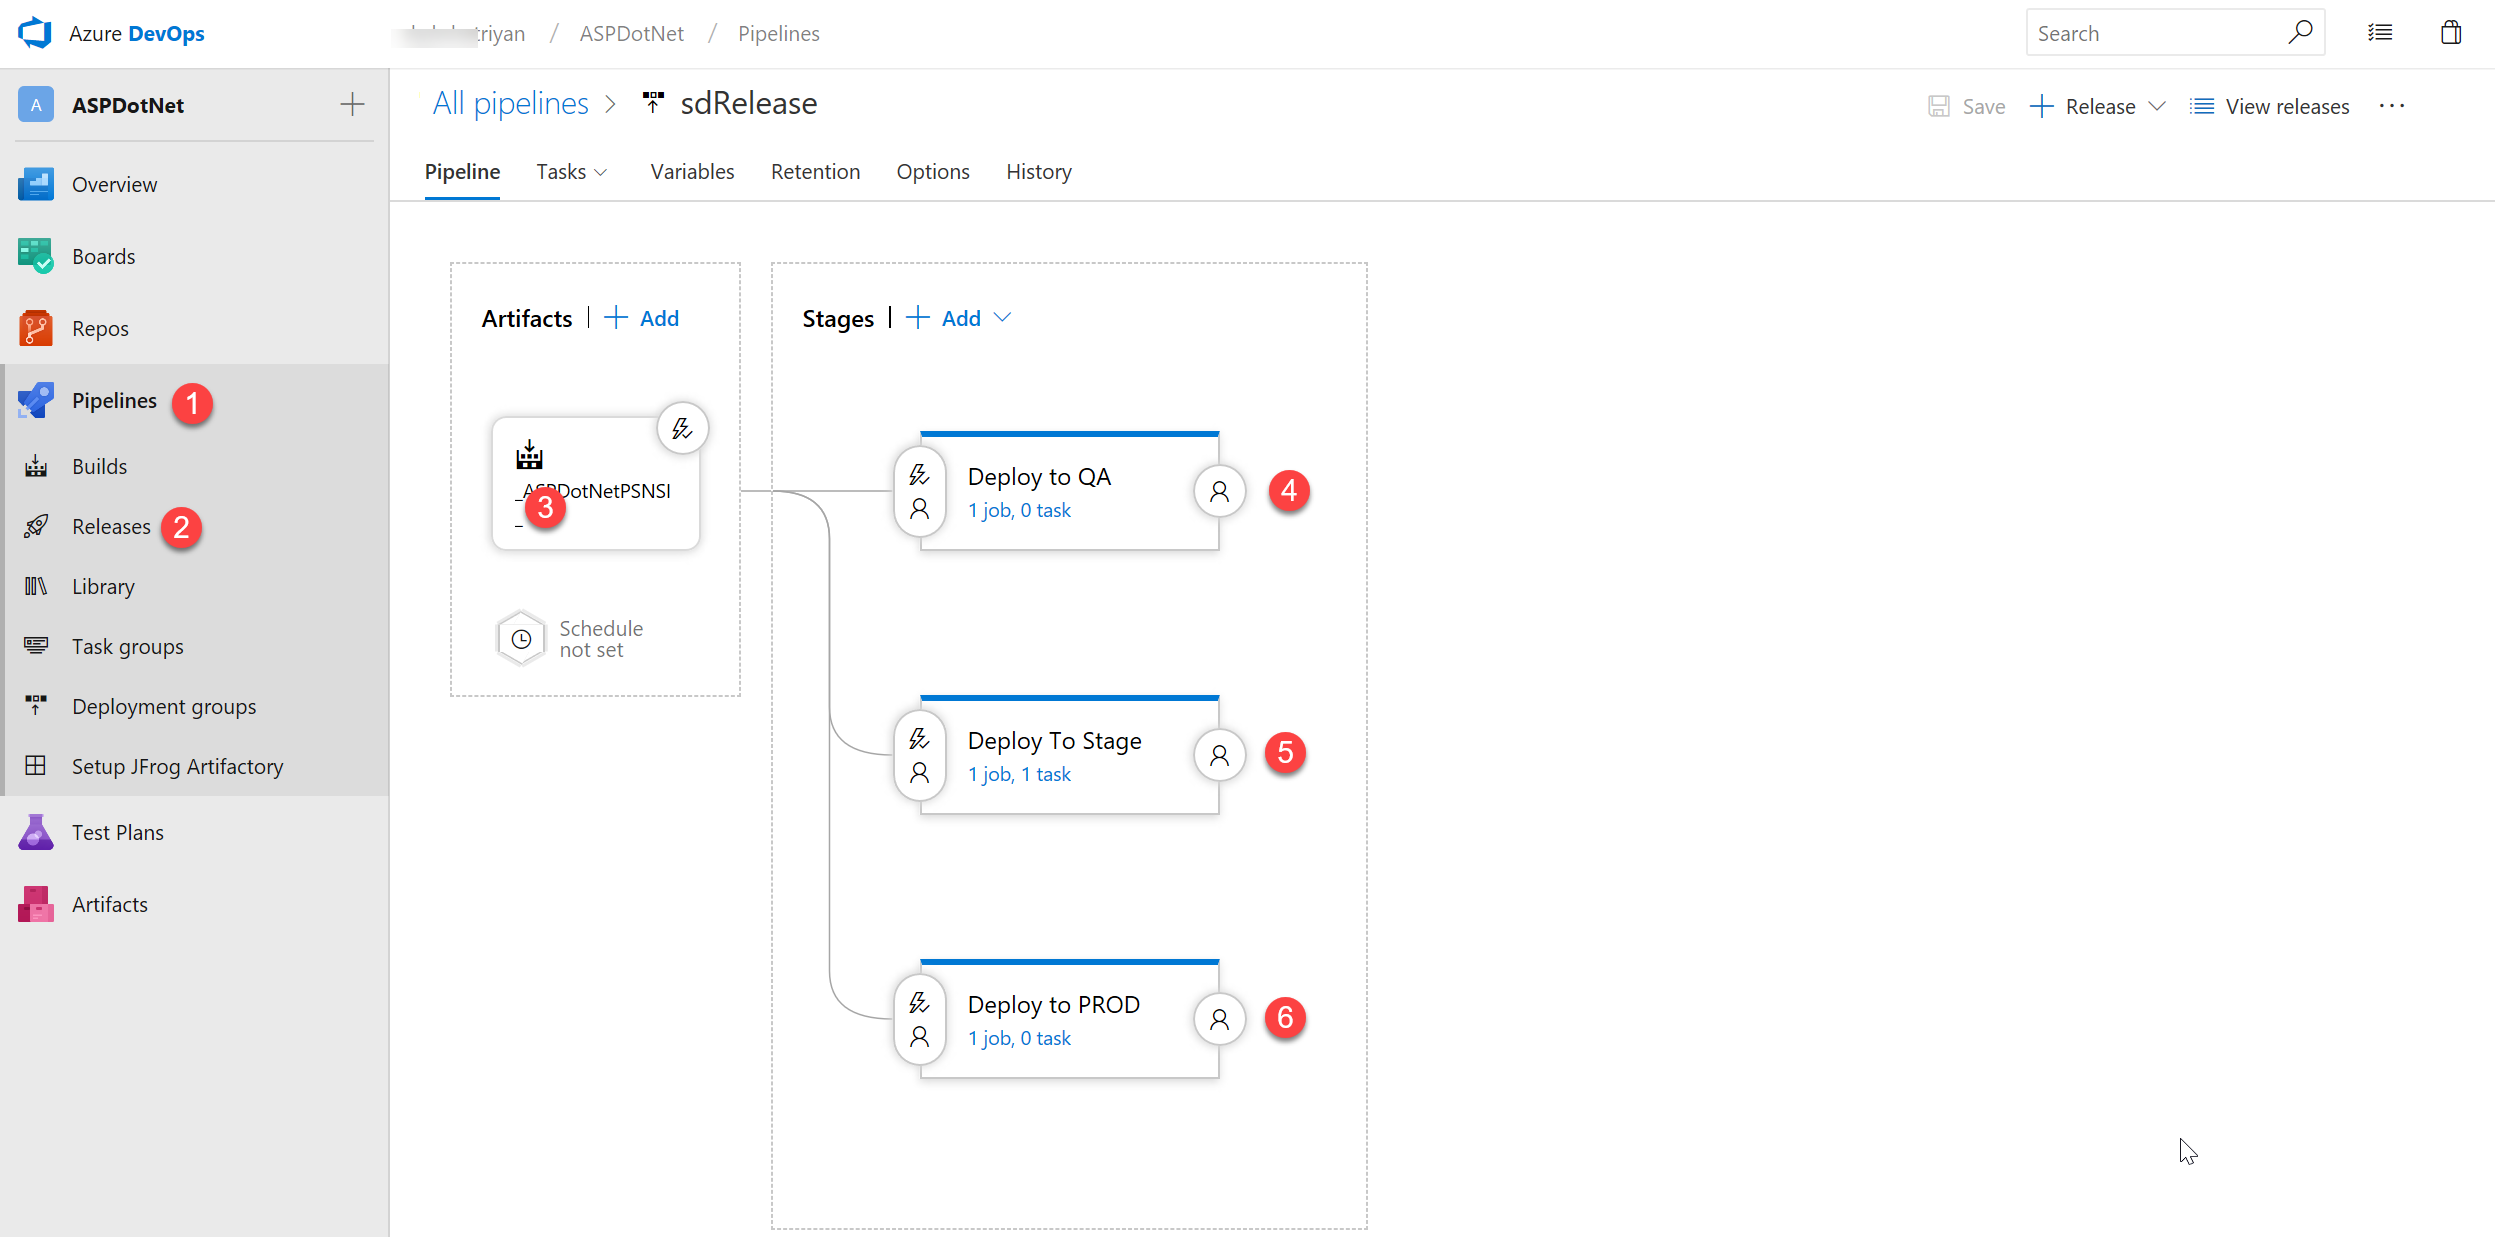
Pipeline Structure:
- Select Pipeline → Release
- Click Edit Pipeline
- Configure Artifacts source
- Create stages:
- Deploy to QA - Development testing environment
- Deploy to Stage - Pre-production validation
- Deploy to PROD - Production environment
Environment Isolation
Each environment should be isolated with separate:
- Database connections
- API keys and secrets
- Configuration files
- Server infrastructure
Step 19: Artifacts Configuration
Define the source artifacts and trigger conditions for releases.
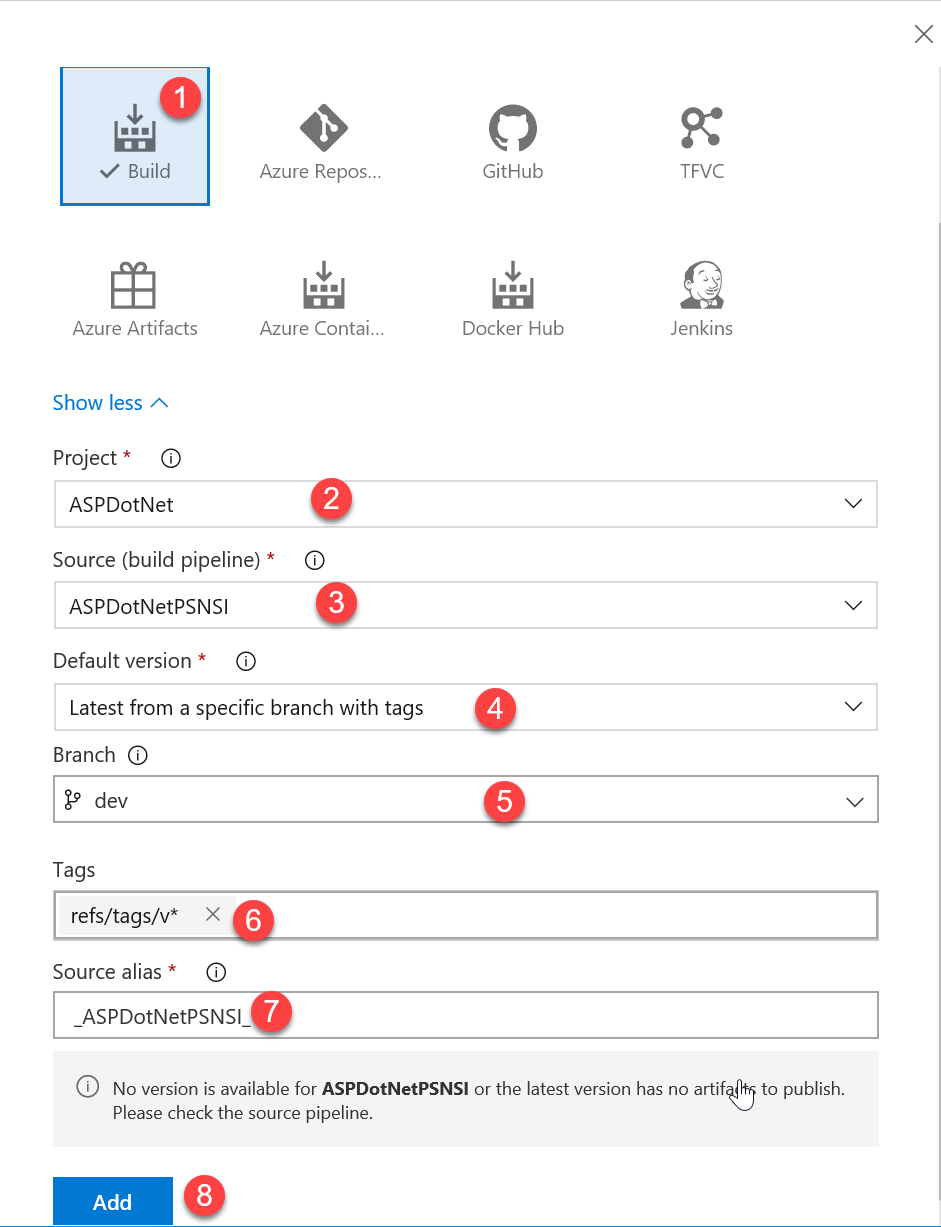
Artifacts Setup:
- Source Type - Select
Build - Project - Choose your project
- Source - Select build pipeline from Step 6
- Default Version -
Specific branch and tags - Default Branch -
dev - Tag Filter -
refs/tags/v* - Source Alias - Descriptive name (e.g.,
_ASPNet-Build) - Click Add
Step 20: Artifact Triggers
Configure continuous deployment triggers from build artifacts.
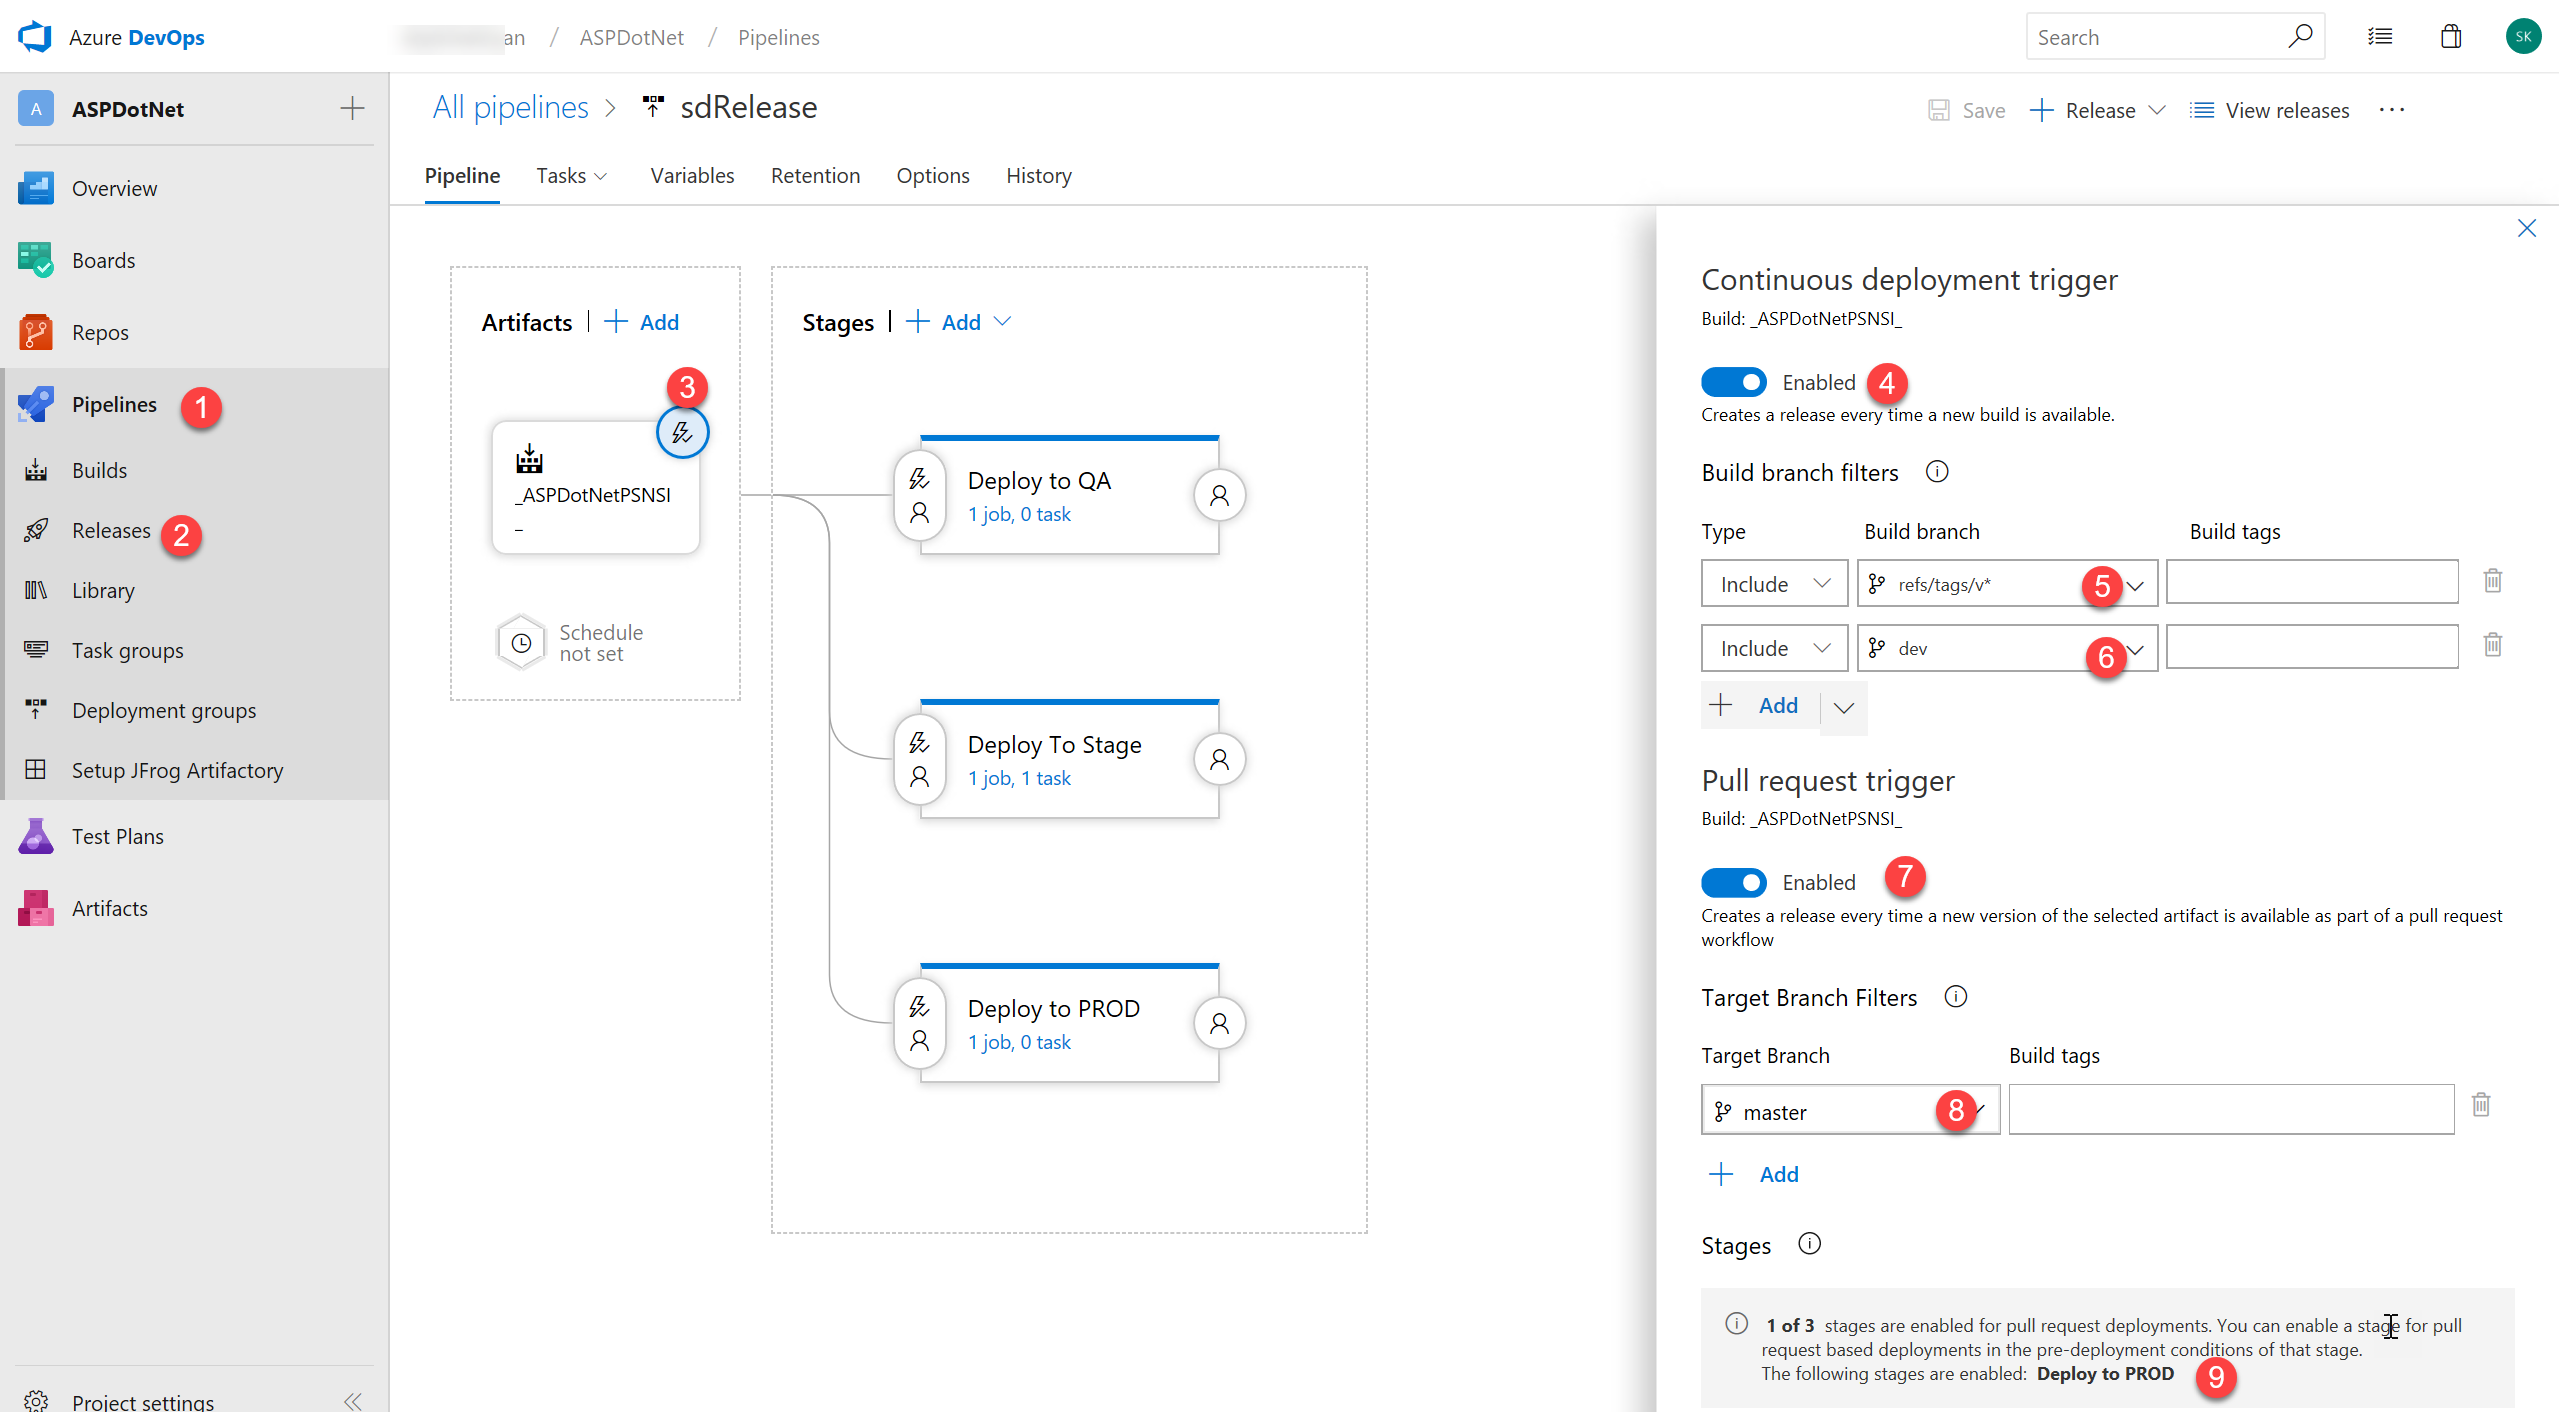
Trigger Settings:
- Select Pipeline → Release
- Click Trigger icon on Artifacts
- Enable Continuous Deployment
- Build Branch Filters:
- Add
refs/tags/v*for tag-based releases - Add specific branches (e.g.,
dev) - Enable Pull Request Trigger
- PR Branch -
master(trigger on merged PRs) - Target Stages - Select which stages to deploy
CD vs Manual Deployment
Continuous Deployment automatically deploys after successful builds. For production environments, consider manual approval gates for additional safety.
Step 21: Deploy to QA Stage
Configure automatic deployment to QA environment from development branch.
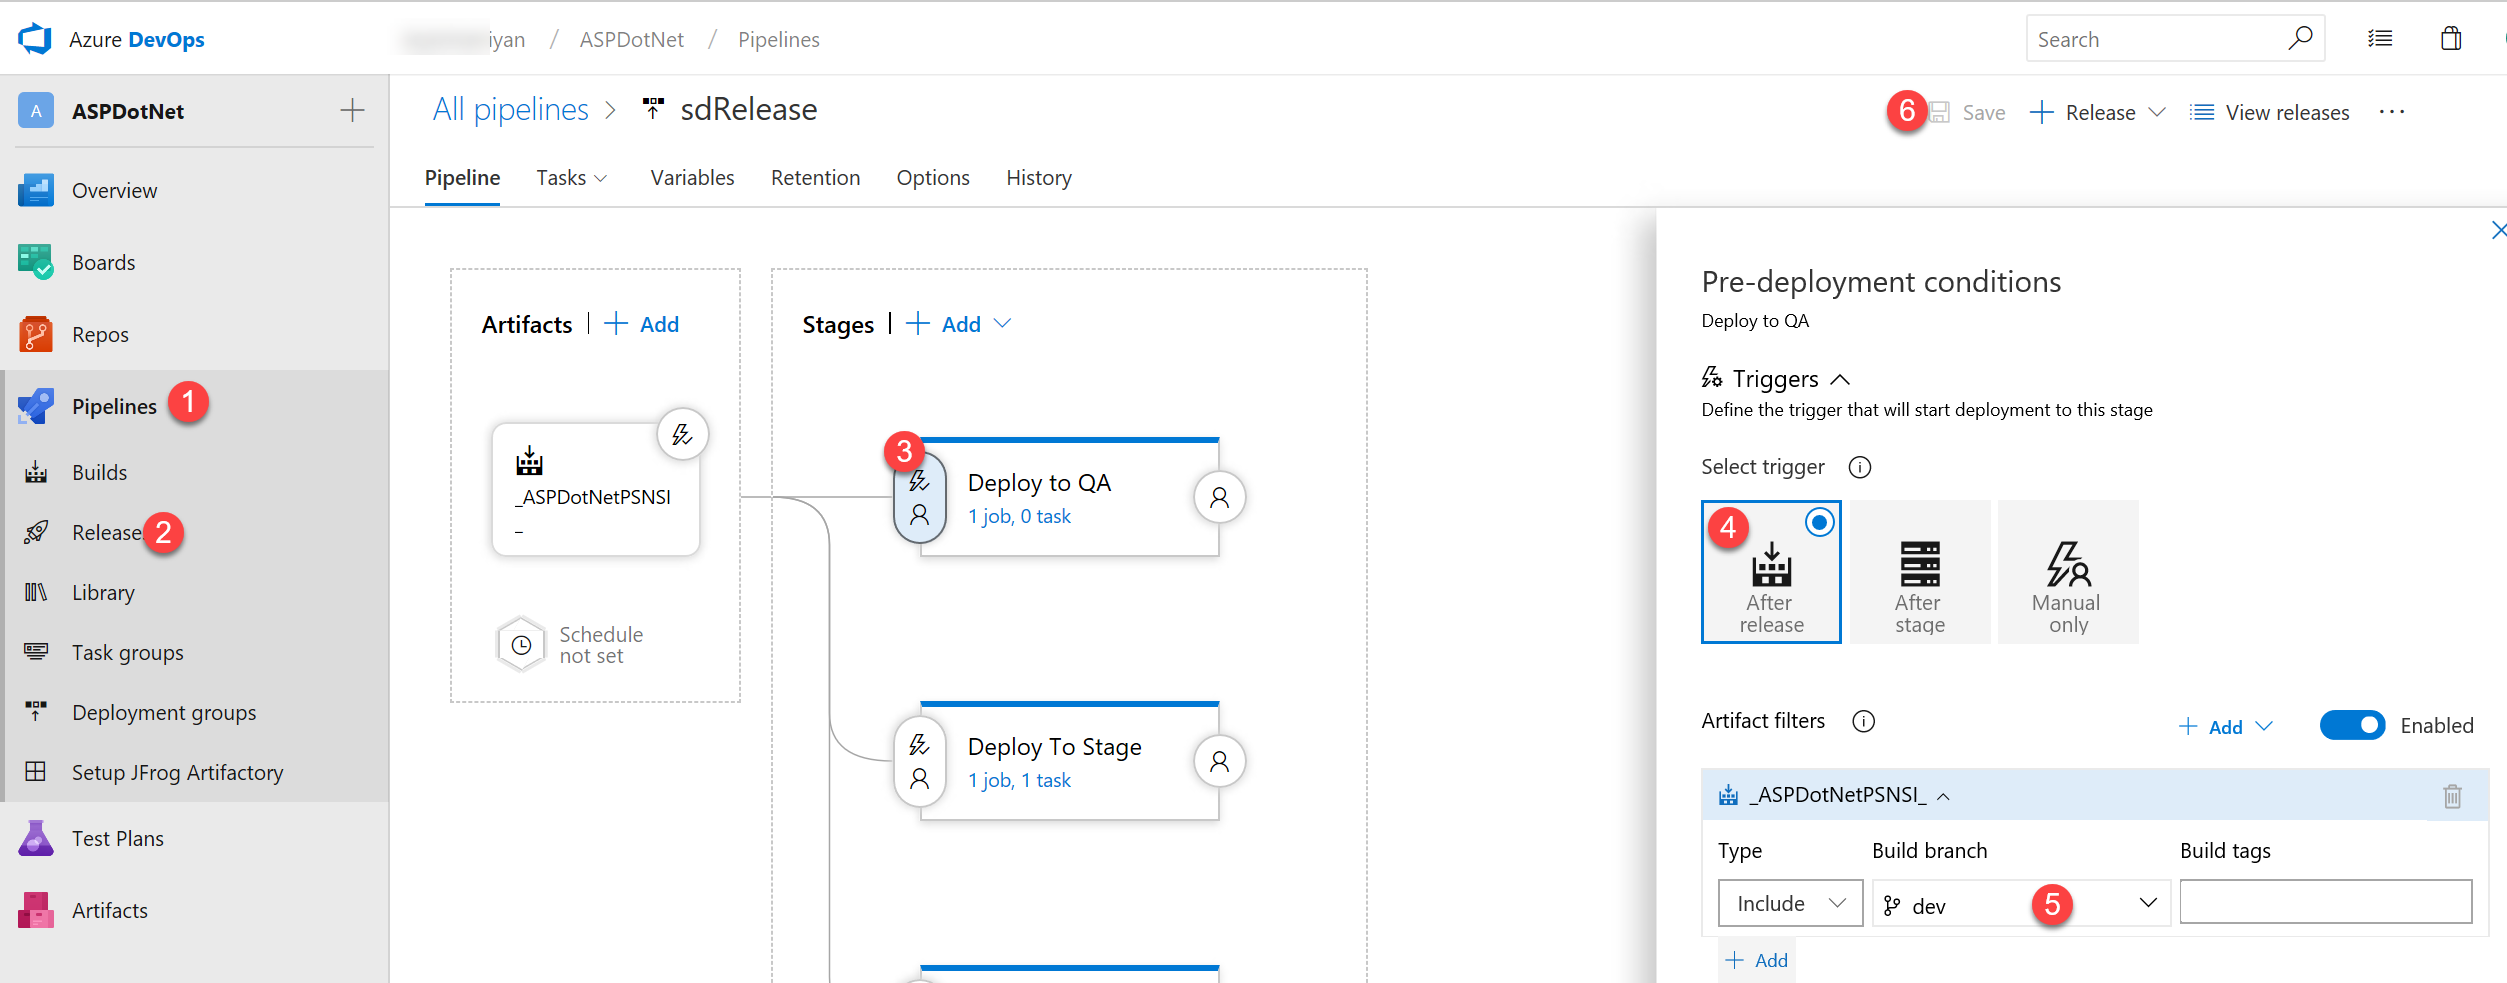
QA Stage Configuration:
- Select Pipeline → Release
- Click Deploy to QA stage trigger (lightning icon)
- Trigger Type -
After release - Branch Filters - Add
devbranch - Pre-deployment Approvals - Optional
QA Environment
QA should mirror production as closely as possible for accurate testing:
- Same OS and framework versions
- Similar database scale
- Comparable network configuration
Step 22: Deploy to Stage Environment
Configure deployment to staging environment triggered by version tags.
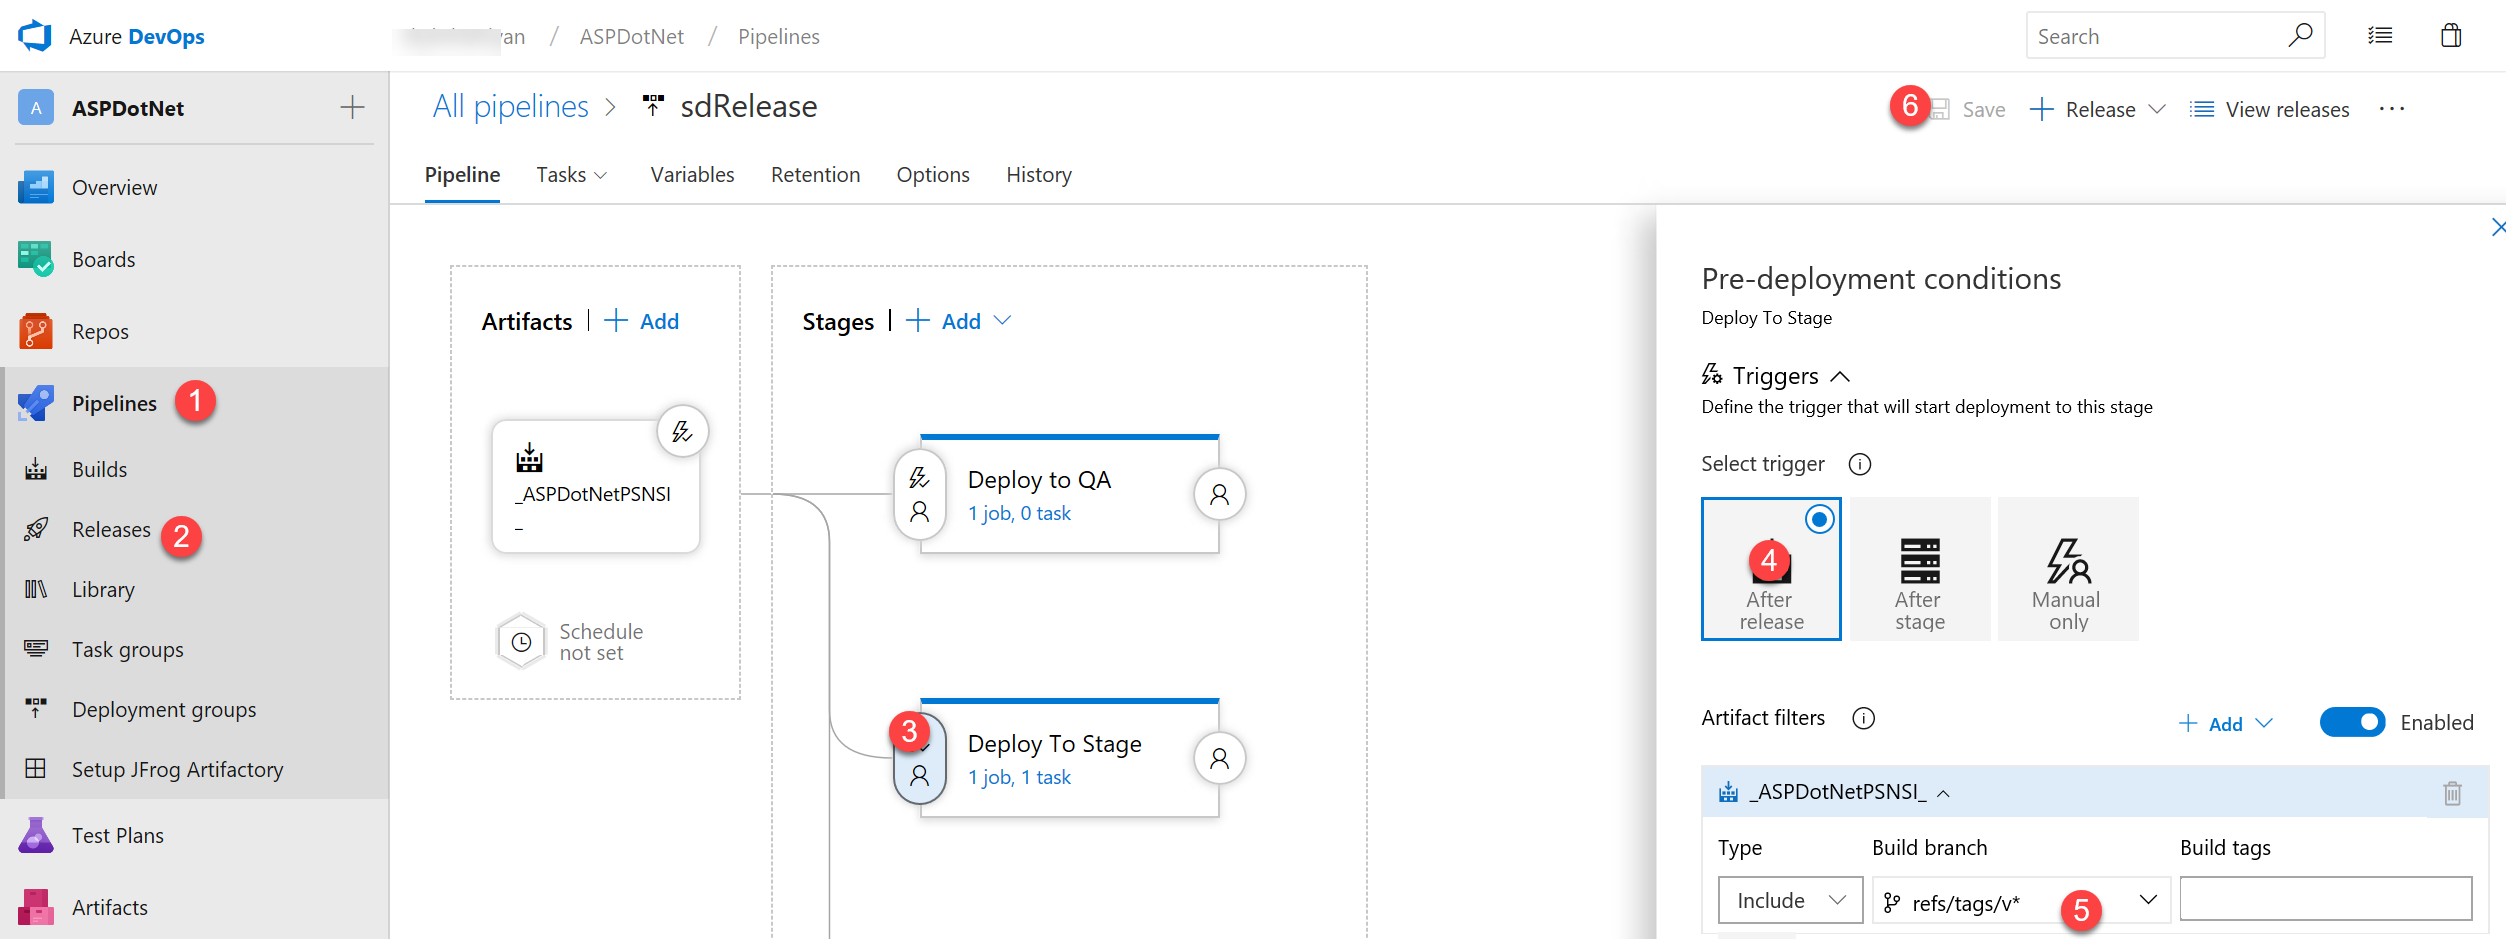
Stage Configuration:
- Select Pipeline → Release
- Click Deploy to Stage trigger
- Trigger Type -
After release - Branch Filters - Add
refs/tags/v* - Save the configuration
Step 23: Stage Deployment Tasks
Define tasks to execute during staging deployment.
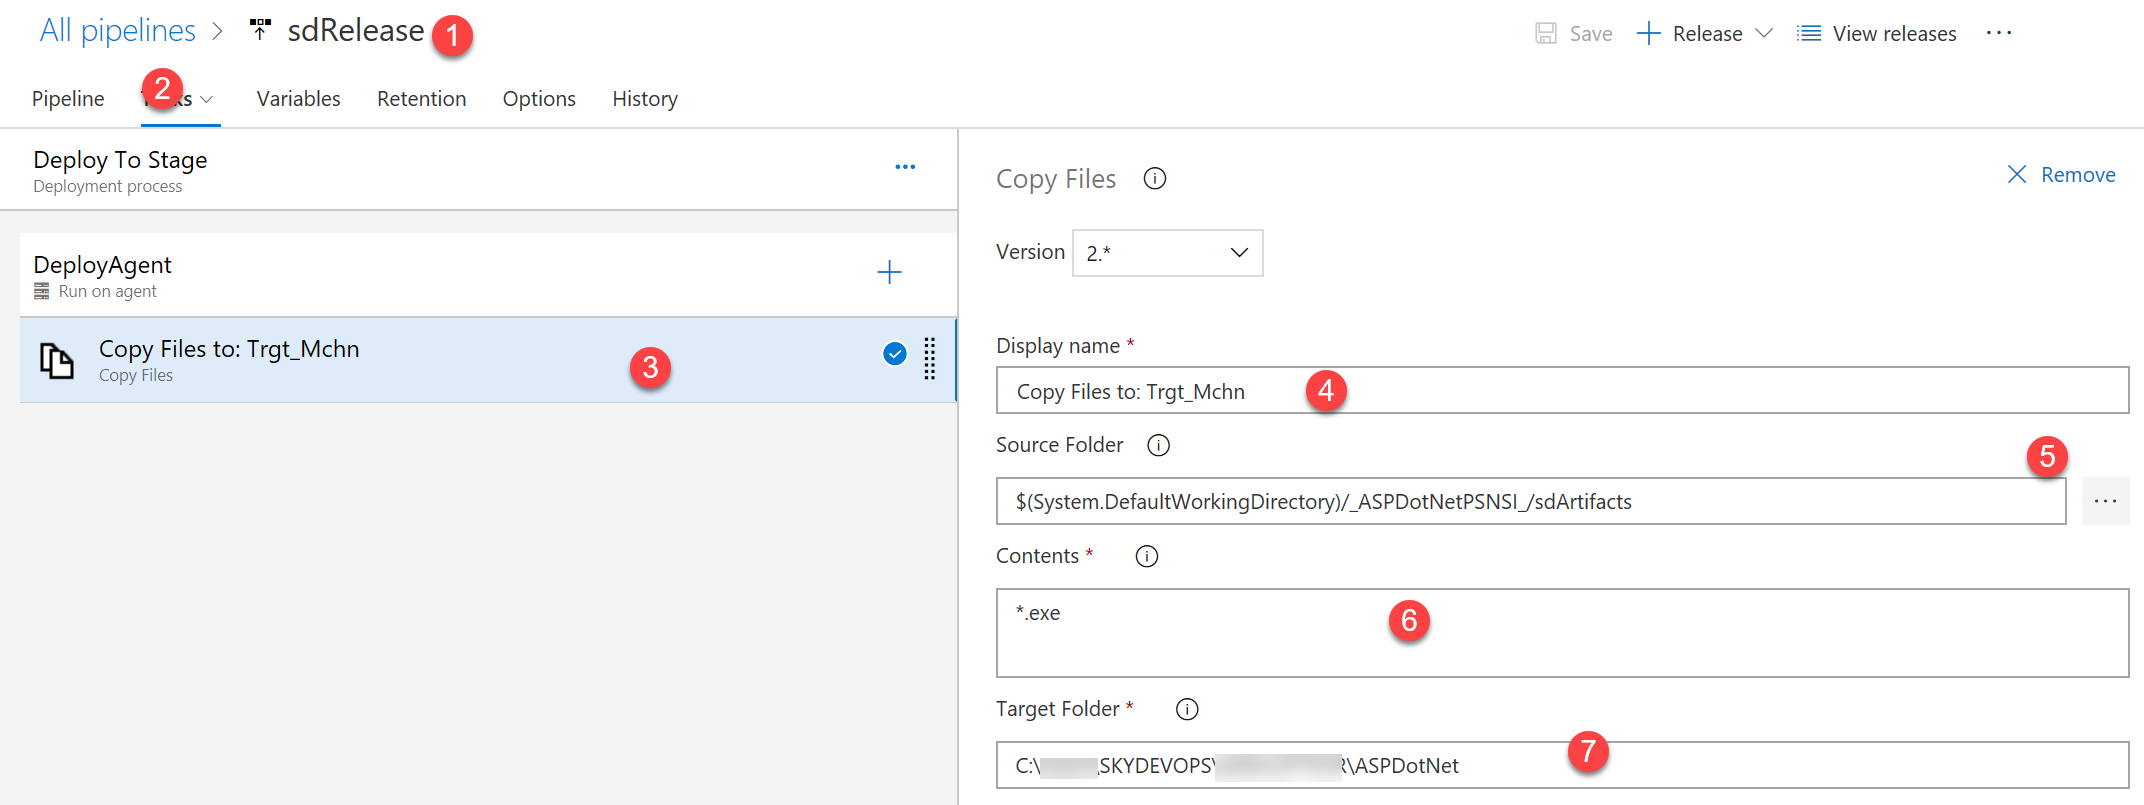
Task Configuration:
- Select Deploy to Stage
- Click Tasks tab
- Add Copy Files task
- Display Name -
Copy Artifacts to Stage - Source Folder -
$(System.DefaultWorkingDirectory)/_ASPNet-Build/SdArtifacts - Contents -
**/*.exe(or specific file patterns) - Target Folder - Stage server path (e.g.,
\\StageServer\Deploy)
Additional Deployment Tasks
Common staging deployment tasks:
- Stop IIS/Service - Gracefully stop the running application
- Backup - Create backup of current version
- Copy Files - Deploy new version
- Update Config - Transform configuration files
- Run Migrations - Update database schema
- Start IIS/Service - Restart application
- Smoke Tests - Verify deployment succeeded
Step 24: Deploy to Production
Configure production deployment with pull request approval workflow.
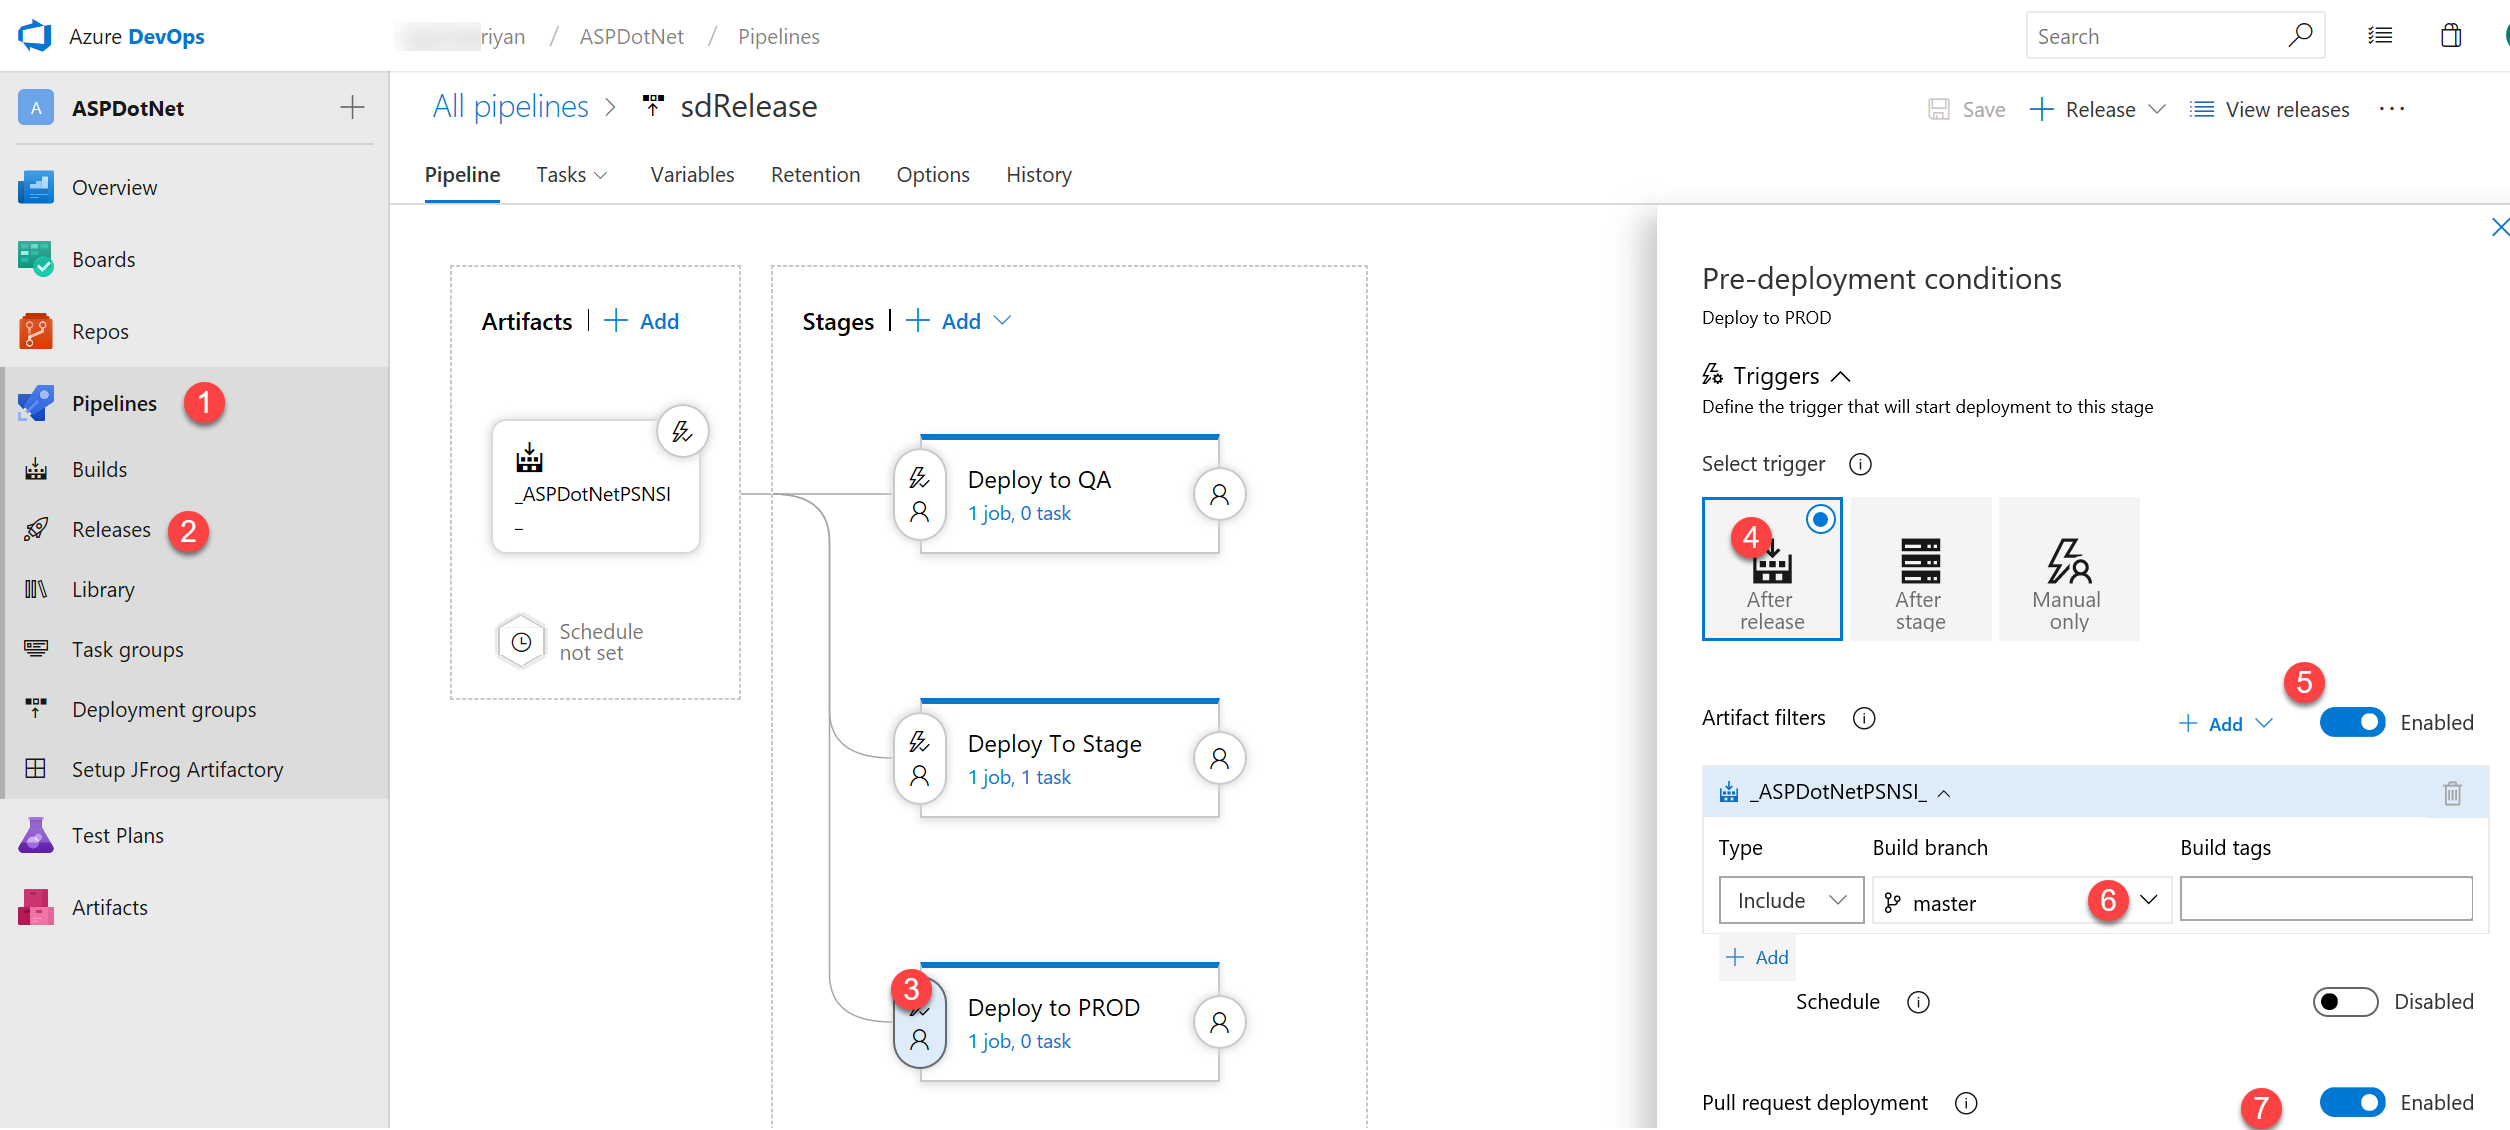
Production Configuration:
- Select Pipeline → Release
- Click Deploy to PROD trigger
- Trigger Type -
After release - Enable Branch Filters
- Branch -
master - Enable Pull Request Trigger
- Pre-deployment Approvals - Add required approvers
Production Safety
Always configure production deployments with:
- Manual approval gates requiring sign-off
- Pre-deployment validations checking health
- Rollback procedures documented and tested
- Monitoring and alerting configured
- Deployment windows scheduled during low-traffic periods
Step 25: Complete Pipeline Overview
View the finished release pipeline with all stages and triggers configured.

Pipeline Overview:
- Select Pipeline → Release
- Choose a release pipeline
- Continuous Deployment indicator shows automation status
- Stage Execution displays deployment progress:
- Deploy to Stage - Triggered and completed
- Tasks executed successfully
- Artifacts copied to target
- Production Deployment - Triggered based on conditions
Pipeline Flow Diagram
sequenceDiagram
    participant Dev as Developer
    participant Git as Git Repository
    participant Build as Build Pipeline
    participant QA as QA Environment
    participant Stage as Staging Environment
    participant Prod as Production Environment

    Dev->>Git: Push to dev branch
    Git->>Build: Trigger CI Build
    Build->>Build: Restore NuGet
    Build->>Build: Compile Solution
    Build->>Build: Run Tests
    Build->>Build: Publish Artifacts
    Build->>QA: Auto-deploy to QA

    Dev->>Git: Push tag v1.0.0
    Git->>Build: Trigger Tagged Build
    Build->>Stage: Auto-deploy to Stage

    Dev->>Git: Create PR to master
    Git->>Build: PR Build & Test
    Build->>Prod: Deploy to Production (Approval Required)
Best Practices
Build Pipeline Best Practices
✅ Use self-hosted agents for sensitive builds
✅ Enable continuous integration on all branches
✅ Run automated tests before publishing artifacts
✅ Version your builds using Git tags
✅ Keep build times under 10 minutes when possible
✅ Use caching for NuGet packages and dependencies
✅ Clean workspace between builds
Release Pipeline Best Practices
✅ Deploy to environments in order: QA → Stage → Prod
✅ Use approval gates for production deployments
✅ Implement blue-green or canary deployments
✅ Always maintain rollback capability
✅ Use configuration transforms for environment-specific settings
✅ Monitor deployments with health checks
✅ Document deployment procedures
Troubleshooting
Common Build Issues
NuGet Restore Failures
- Verify network connectivity to NuGet.org
- Check authentication for private feeds
- Clear NuGet cache:
nuget locals all -clear
Build Agent Offline
- Check agent service status
- Verify network connectivity to Azure DevOps
- Review agent logs in
_diagfolder
Build Timeouts
- Increase timeout in pipeline settings
- Optimize build by using incremental builds
- Consider using build caching
Common Deployment Issues
File Locks During Deployment
- Stop IIS/services before copying files
- Use app_offline.htm for ASP.NET deployments
- Implement proper service restart sequences
Configuration Errors
- Verify environment-specific config transforms
- Check connection strings and API keys
- Validate certificate installations
Permissions Issues
- Ensure service accounts have deployment permissions
- Check file system ACLs on target servers
- Verify firewall rules allow deployment traffic
Environment Variables Reference
| Variable | Description | Example |
|---|---|---|
$(Build.BuildNumber) | Unique build identifier | 20231015.1 |
$(Build.SourceBranch) | Branch being built | refs/heads/dev |
$(Build.SourceVersion) | Commit SHA | abc123def456... |
$(Build.ArtifactStagingDirectory) | Artifact output path | C:\agent\_work\1\a |
$(Release.ReleaseId) | Release identifier | 42 |
$(Release.EnvironmentName) | Target environment | Production |
$(System.DefaultWorkingDirectory) | Working directory | C:\agent\_work\1\s |
YAML Pipeline Example
For modern Azure DevOps implementations, consider using YAML-based pipelines:
azure-pipelines.yml
trigger:
  branches:
    include:
      - dev
      - master
  tags:
    include:
      - v*

pool:
  name: 'Default'

variables:
  solution: '**/*.sln'
  buildPlatform: 'Any CPU'
  buildConfiguration: 'Release'
  artifactName: 'SdArtifacts'

stages:
- stage: Build
  displayName: 'Build Application'
  jobs:
  - job: BuildJob
    displayName: 'Build and Publish'
    steps:
    - task: NuGetToolInstaller@1
      displayName: 'Install NuGet'

    - task: NuGetCommand@2
      displayName: 'Restore NuGet Packages'
      inputs:
        restoreSolution: '$(solution)'

    - task: VSBuild@1
      displayName: 'Build Solution'
      inputs:
        solution: '$(solution)'
        platform: '$(buildPlatform)'
        configuration: '$(buildConfiguration)'

    - task: VSTest@2
      displayName: 'Run Unit Tests'
      inputs:
        platform: '$(buildPlatform)'
        configuration: '$(buildConfiguration)'

    - task: PublishBuildArtifacts@1
      displayName: 'Publish Artifacts'
      inputs:
        PathtoPublish: '$(Build.ArtifactStagingDirectory)'
        ArtifactName: '$(artifactName)'

- stage: DeployQA
  displayName: 'Deploy to QA'
  condition: and(succeeded(), eq(variables['Build.SourceBranch'], 'refs/heads/dev'))
  dependsOn: Build
  jobs:
  - deployment: DeployQA
    displayName: 'QA Deployment'
    environment: 'QA'
    strategy:
      runOnce:
        deploy:
          steps:
          - task: DownloadBuildArtifacts@0
            inputs:
              buildType: 'current'
              downloadType: 'single'
              artifactName: '$(artifactName)'
          - task: CopyFiles@2
            inputs:
              SourceFolder: '$(System.ArtifactsDirectory)/$(artifactName)'
              Contents: '**'
              TargetFolder: '\\QAServer\Deploy'

- stage: DeployStage
  displayName: 'Deploy to Staging'
  condition: and(succeeded(), startsWith(variables['Build.SourceBranch'], 'refs/tags/v'))
  dependsOn: Build
  jobs:
  - deployment: DeployStage
    displayName: 'Staging Deployment'
    environment: 'Staging'
    strategy:
      runOnce:
        deploy:
          steps:
          - task: DownloadBuildArtifacts@0
            inputs:
              buildType: 'current'
              downloadType: 'single'
              artifactName: '$(artifactName)'
          - task: CopyFiles@2
            inputs:
              SourceFolder: '$(System.ArtifactsDirectory)/$(artifactName)'
              Contents: '**/*.exe'
              TargetFolder: '\\StageServer\Deploy'
Additional Resources
Further Reading
Summary
This guide has walked you through the complete process of setting up a professional CI/CD pipeline for ASP.NET applications using Azure DevOps. Key accomplishments include:
Build Pipeline
- Configured self-hosted build agents
- Set up automated builds with continuous integration
- Implemented NuGet package management
- Created versioned artifacts and executables
Release Pipeline
- Established multi-environment deployment workflow
- Configured automated deployments with branch/tag filters
- Implemented pull request workflows for production
- Set up approval gates for critical deployments
Best Practices Implemented
- Environment isolation and configuration management
- Automated testing and validation
- Version control and tagging strategies
- Monitoring and troubleshooting procedures
By following this guide, you've created a robust, automated pipeline that accelerates development velocity while maintaining quality and control over your deployments.
Last Updated: October 2025
Originally Published: November 2018